About The Work Room

The Work Room is the Creative Journal of Wendy Sue where she shares her creative journey in all things handmade. The Work Room also offers an alternative to your typical jewelry making workshops. Scroll down to the end of the page to see how you can learn to make your unique piece of artisan jewelry online.

Tuesday 28 April 2009

Jewelry photography for dummies

..................................................................................................................................................................................................................................................,.........
Work Room chat:
If you are interested, here is the article that I first came to learn about the EV. Although it also talks about white balance but I hardly adjust them for my need. I had mine set to auto and it has been working just fine for me.

..................................................................................................................................................................................................................................................,.........

Photography does seem to be the trend these days, isn't it? You can almost see everyone picking up photography as their hobby and some even turning it into a part time source of income, which if you think about it comes in really handy in times of economic recession like these, where people want to cut cost in giving up the professional photographers which comes with the 'professional' charges and amateurs sure can do with some extra income! (Phew! That's quite a mouthful there!)

Some of these amateurs photographers is just as good as the professional ones, if not better, mind you. But of course, those DSLR (I think that's what they are called) cameras makes it all the more possible these days. LOL....


Even my cousin bro is doing this part timely and wouldn't even mind changing profession if the returns were more than satisfying! Anyway, if anyone in Malaysia is interested, do let me know and I'll pass you his number. Don't worry, he won't cost you a bomb and he's very good! ;)


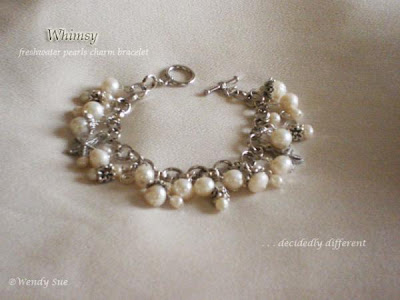
But then, of course, those are not the type of photography that I want to talk about. To be honest, I know nuts about photography! And neither do I own a DSLR camera which is so capable of taking super nice pictures. I'm only concern with jewelry photography and what I am about to share here is from the experience and point of view of a photography dummy who needs effective and hassle-free pictures.

Effective in the sense that pictures should turn out clear without a great disparity in the representation of colours sans photoshop. I'm doing everything myself, every single aspect of it. So, I simply do not have the time for any editing work in photoshop. I pretty much want it to be A-okay on the first few take.

Yeah, some might reckon I'm expecting too much since I'm not even familiar with photography to begin with but then I seriously can't be bothered with any editing job. It HAS to be okay during takes. All those post editing work is just way too much of a hassle for me.

The first camera I got, which was also the first digital camera I ever own, was SONY CYBERSHOT DSC600.


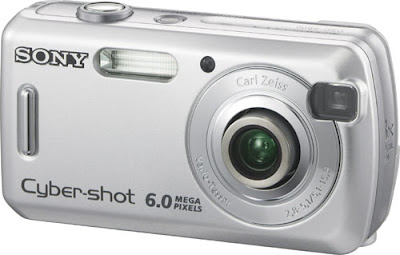
Since everything was the first, unsurprisingly, the pictures that I manage to produce were also very first timer; all lacking in all that I was hoping it to be.


I had a problem handling the flash issue, taking clear close up pictures and the background colour. It took me approximately 2 years to finally figure it all out. Not to say that I'm an expert already or that the pictures I'm producing now is brialliant on its own but I believe pictures taken these days were of much acceptable clearness and presentable.

You have no idea the amount of research taken before I came to this conclusion but basically, to keep things simple, this is the three tips to keep in mind when photographing jewellery.

  1. Lighting
    I prefer to take pictures with the flash off and depending solely on natural light source. I've tried using fluorescenr light and those day light bulbs and adjusting the white balance in the camera accordingly and the pictures still turn out with weird colours.

    I finally settled with natural light and adjusting the exposure value in the camera instead.

    Let me first clarify what natural light means. Basically, it just means sunlight. :)

    You don't necessarily need direct sunlight shone onto the piece. Just as long as the brightness around you is from sunlight and not any artificial(?) light source.

    This is how I normally do it


    I usually take my pictures outside at the porch but you don't necessarily need to move a table and chair outside. I already have a table outside my porch. I just moved a stool outside. =P

    I've also try doing it next to the window with the shutters open so that I get as much sunlight in as possible.

    The next thing you do is to adjust the settings of your camera. The feature (or whatever you call it) that we will be adjusting is the exposure value which is normally marked as EV in your camera. What changes the exposure value will make is in brightening your pictures or making it darker.

    The EV icon is acompanied by the + and - sign. So if you want to brighten the picture, increase the value of EV and reducing it to make the picture darker. Take the pictures below as an example.


    I think this was taken with EV +1.3


    And I think this was with EV -0.3


    See the differences between the two pictures? While the overall picture brightens and darkens the colour doesn't change too drastically and if I'm allowed to be bold enough to say that it's true even to the actual colour.

    But be carefull not to increase the EV value too high that the picture might end up overexposed.


    As you can see in the outdoor picture before this, you'll realize the overall picture is quite dark. Well, that was taken with EV value 0.0, which should technically be the actual lighting condition (I think!). It was actually raining at the time that picture was taken.


    It was indeed rather dark at that time.


    But looking at this pictures taken of the ring, it sure doesn't look like it, does it?


    That is why I've always prefer reliance on natural light source rather than artificial ones eventhough the lighting might poor because you always have the EV to manipulate! :D


  2. Macro
    This is not the Macro hypermarket, mind you. =P I think they're no longer in operation anymore as well, aren't they? If I'm not mistaken, I think Tesco has taken them over or something. Anyway, I'm digressing already.....

    Alright, the macro here is one of the specification of the camera. You will need a camera with this function in order to take clear close up pictures of your jewelleries.

    You don't need any special camera for this function. Most camera have them now I think, especially the Canon ones but nevertheless, it's always better to check beforehand.

    The Sony DSC600 I got haven't got this function, which was why I've had a hard time capturing clear pictures.


    It was not until speaking to my brother about it that I learn about the macro function of the camera. So, make sure you have the camera set to the macro function before snapping away.

    p/s: I later on changed my camera to RICOH Caplio R7.


  3. Background
    Okay, I'm a bit mixed when it comes to the choice of colour for the background. I started off with black.....


    And move on with beige......


    But finally settle with white.


    I've seen some people using very nice background. Patterned paper and even with props and all that but I just can't pull them off....


    It's obvious that I'm failing miserably here... -___-


    Which is how I finally ended up with the white background.

    I find that a white background is almost a fool proof for a beginner to come up with professionally taken pictures. Well, at least I think it is. :P

    So, having decided on the colour of the background, the next you might want to consider is the type of material that you are going to use for your background.

    As you can see from my earlier pictures, I was using cloth for the background but for the white background from the recent pictures, I uses paper.

    What paper, you ask?

    Poster paper. :)


    How so?

    Well, turn to the back.


    Why poster paper?

    Well, for one, they are big enough. Secondly, they are more often than not made from high quality paper and if you should realize, macro function picks up even the slightest detail on close up. So, a good quality paper shows a nicer sheen.

    Like the one I'm using here has got a glossy sheen which is why in some pictures, it actually shows.

    No particular reason other than for the aesthetic aspect of the picture. :P Movie posters would be great too because those would be big enough but you will need to look for those with one blank side though. Go check out from TGV or GSC. I'm sure they won't mind sparing you some. After all, they will be throwing it away after a movie finishes its running , right?


  4. Well, these are just some of my suggestions which may or may not work for you. This is the conclusion that I come to after experimenting with different method.

    Most of the serches I made on the internet suggested the use lightbox, which is great for photographing jewelleries indoor, something admittedly which is a fallback of the method I've just explained above.

    I've read that you can buy these lightboxes and unsurprisingly, they are rather costly. You can also make them yourself, which I've also tried based on some instructions I've found but it didn't quite work at all.

    So, that's a little something that I still need to figure out.

    post signature

Read More...

Saturday 25 April 2009

One month

..................................................................................................................................................................................................................................................,.........
Work Room chat:
I'm thinking of signing up for some workshop or something to fill up the time. Was thinking of doing some part time course initially but there's apparently the visa issue. The English are quite strict with what you are allowed and not allowed to do with the visa granted to you..... oh, well.... o_O

..................................................................................................................................................................................................................................................,.........

The tulips are just gorgeous, aren't they? ;)


Yea, it has been one month already since I'm in England. Time sure flies, doesn't it? Weather has been great for the past week. We're getting a bit of sun almost everyday for the past week, which has been great!

You don't get a lot of sun here, in England. That is why winter over here can be just awfully dreadfull. In the words of my relatives here, people here literally go 'crazy' on a sunny day. LOL!! XD

The sun here is great too. It's not like the sun back home where it is scorching hot and burning the skin. The sun here is just warm and nice which I think is probably why people here enjoy sunbathing so much. The warmth of the sun ray on your skin against the chilly atmosphere feels really nice.


See, there's shadow behind the pots! XD


Alright, enough of the weather already. It's about time I got settle down and so has Funky Pots at West Bridgford. School here has resume classes after the Easter break and Finky Pots also has calm down a little.

Stayed in most of the time for the past week and it's about time I get back to making jewellery too. Haven't been making much jewellery for the past couple of months and I'm about to get rusty already too if I don't get me hands on the pliers and beads soon. :P LOL.......


See that Hitz.fm website on my laptop's screen? I listen to Hitz online on my laptop everyday. Just you know, so that I feel like home is still close to me..... :)


This is Sa Kor's dining area and also dining table but it does somehow feels like a mini studio in itself actually. I don't know if it's due to the small enclosed area, the lighting or the window looking out the streets but it feels great working from there.


Or maybe, it's just the big dining table as my workbench! Heheh......


I think most artist work space would also be as messy as this when they work, huh? (or maybe it's just me who is the messy one.... LOL..)

Alright, anyone who would like to beg to differ, please feel free to do so. :P Seriously, I think I need to learn how to work in a neater manner too. So, do share some tips with me, ya. ;)

I normally store my beads in plastic container boxes but I didn't bring them over with me due to space and weight constraints, of course. Those plastic storage boxes while keep the beads organized and all, was just not feasible for me to bring them over with me. So, I transfered all the beads into varrying zip lock bags and sort of vacumn packed them over.

Just imagine the chaos in searching what I want in where I thought I placed them. It's insane, really! @_@

Even Sa Kor herself hoard a good collection of beads herself and I was also allowed to use them since she herself hardly got much time to utilise them. Her work would be enough to keep her occupied the whole week already!


Beads are kept in boxes here and there and all over the place!


Basically, the entire home studio is a bit chaotic. Okay, maybe chaotic is even an understatement. I just told Sa Kor if I were to just sit down here and make jewellery from morning to night for the 6 months (....no, make it 5 now) that I'll be here, I don't I'll finish using up the beads either and she couldn't agree more!

I think we beaders have a bad habit. We tend to hoard more than we were able to use or the rate we go about buying beads is faster than we go about using them, don't we? LOL....

Also, I'm not sure if any of you have experienced this before. I sometimes feel heavy hearted to use some of the beads because they are so pretty even by themselves that I feel so reluctant to use them because I won't be able to see them anymore if I finish using them up. Ermm....something like a break up?

And sometimes, there are some beads that I couldn't wait to use them up and I just couldn't because no matter how many projects I've been using them with, they are still left hanging around. Errmm.... something like being stalked by people you don't want to see?

LOL.... alright, so maybe this is a bit silly, both the analogy I'm making and the experience itself but.....just wondering if any of you have felt the same way before.

I've made a few pieces already. Will photographed them soon.

Alright, time to clear up the table for bedtime now.


post signature

Read More...

Tuesday 21 April 2009

Hobbycraft


This is like the hypermarket craft store here. A pretty neat place. You can find materials for almost all of the craft here. Papercraft, jewellery making, knitting.... and lots more. You name it, and they've pretty much got it all.

I wanted to take some pictures of the interior but there were cctv everywhere. I would have risk doing it anyway but since Sa Kor's reputation is also at stake, I thought I had better not. English people tend to follow the book closely when it comes to the law and rules and regulations.

Anyway, it was a really cool place. Their jewellery making section, although not very big but has a surprisingly good variety of stuffs. However, because of the exchange rate, it was all rather expensive to me.

Didn't got myself any beads or findings. Sa Kor did however got a book on craft wire by Beadalon from there.


I think it costs something like £7.99, if I'm not mistaken. Yet to have the oportunity go through the book though......


post signature

Read More...

Friday 17 April 2009

Jewelry glue

..................................................................................................................................................................................................................................................,.........

Work Room chat:
It was also after watching this video by Xiaxue (one of Singapore's top blogger) where she was decorating her gadgets with those crystal Hotfix using epoxy glue that I was confident of the strength of the glue. I also remembered vaguely in one of the Taiwanese tv show on the same topic also mentioned some AB glue; which is what they called it there (A as one of the tubes and B for the other). I know they were refering to epoxy glue because they mention about mixing two tubes of glue together and as far as I know only epoxy glue is being used that way.

..................................................................................................................................................................................................................................................,.........

The purist don't believe in using glue when it comes to jewelry making. I think the purist idea can only apply to wire jewelry artist. For other jewelry artists who uses mixed media in their work, I think the use of glue is almost inevitable. An example that I can think of right now is the making of glass stud earrings. How else can you stick the flat pad post to your piece of glass?


When it comes to jewelry glue, the concern has always been to find one which is strong enough. I'm not sure if there are any glue specifically made only for jewelry making but I have tried a few before finding out which one which actually works the best for me.


UHU glue by the way, is NOT a very strong glue. So, if you need a stronger adhesive where your piece might potentially carry some weight, UHU glue is not a very good choice.

ELEPHANT glue, I heard is quite strong enough for the job. This type of glue is, I think, probably familiar only with the Malaysians because I sure am having difficulty finding a picture of the glue on the internet! LOL......

Elephant glue is a clear, watery, colourless liquid, unlike UHU glue which is more in a gel form. I've used Elephant glue before for other stuffs and have noticed that it dries up with a white cast. Therefore, you might want to be extra careful when using this type of glue because it might affect the finishings of the beads if they are accidentally tainted with this glue. Especially if it's crystals, you can bet on your dollar that it will never sparkle the same way again.

I've also tried GS Hypo Cement before.


Apparently, GS Hypo Cement has been known to be used for jewelry making but the box also states that it is used for watch repair. What I really like about this tube is how it comes with a sharp tip precisiob applicator which works great to reach those small creaks minus the mess. Now this explains why it is also used for watch repairs la. We all know how tiny the watch mechanism are.

Despite being the plus point for this tube of glue, it was also what I found to be a pain.

You see, there is a needle end on the cover which will close up the precision applicator when you capped the tube. I find it terribly annoying to cap the tube because of the precision capping. Because the hole on the precision applicator is very small and the needle tip on the cover very fine, it requires some effort to cap on.

Also, because of the way I was squeezing the tube and the narrow tip, the pressure causes the glue to be over-flowing out even before I could cap on properly and when I do managed to cap it on, the overflowed glue would remain around inside of the cap and you just have no idea what a nightmare it was when the glue dried and you trying to uncap it the next time you want to use it, which by then even the precision applicator is covered with dried up glue! I couldn't show you a picture of what I meant because I didn't bring the tube over with me.

Needless to say, it certainly wasn't my choice since I find using it to be such a pain, precision application or not. The glue's strength I find, only to be of a moderate strength. So, not something I'm in awe with.

The best jewelry glue I found so far has got to be the two part epoxy glue.


Hah! I brought mine over for the obvious reason that they work for me! =P LOL.....


Basically, the glue comes in two tubes. One clear and the other somewhat opaque white. One of it is the hardener and the other, the resin. I'm not sure which is which though. I think the clear one is the resin and the opaque one, the hardener.


Anyway, what you do is to mix the two together and then use it to glue.


As simple as it sounds, the glue will nevertheless fail you if you do not mix them properly which it has already failed on me on numerous occasion. But if done properly, you can be rest assured that you've got a strong bond.

These are a few tips to take note of. I've basically summarized them up from the information I manage to gather.

Before gluing
It is a good idea to clean the mating surfaces to remove grease and dirt. Many findings have a think layer of oil left over from manufacturing and crystals often have oil from your fingers. Sometimes, you might also want to roughen the surfaces of metal parts with a file or sand paper. If you are using sand paper, buy those with finer grains as the rougher ones might spoil your work altogether but the finer ones will work just fine. The idea here is not to prevent a sleek surface which might affect the quality of the bond.

Mixing
Make sure you squeeze out equal amount from both. This is important as unequal composite of both will definitely affect the quality of the bond. No doubt it will be futile to squeeze out the exact scientific amount from both. I normally just guesstimate but what you can perhaps do is to draw two equal circles side by side on a piece of paper and squeeze to fill up the circles.

I wonder those that they sell in conjoined tubes might make squeezing out equal amounts from the two tubes much easier?


Unfortunately, you can only get these from overseas.


One thing you might want to take note is not to squeeze out too little. Past experiences has taught me that squeezing out too little (in order to save since I'm only gluing a piece) will not make a strong bond. Yes, even if its equal little amount from both tubes.

Mix the two part together with a toothpick or whatever stick available to you to do the mixing. The first stirring will start a chemical reaction for the resin and hardener to combine. Stir them longer than necessary for the second mixing for to ensure that both are thoroughly mixed. Not mixing the glue enough can cause failure.

With 24 hour epoxy, let it sit for a while so it becomes a little tacky. With the 5 minute type of epoxy you should start working right away as it sets up quickly. The one I bought is the 5 minutes type. And just like with any glue, it sticks better when they are tacky because you risk the item slipping off when it is too wet. Let it sit for at least 24 hours to cure the glue.

Leave your mixing stick and some left over glue on the mixing sheet. If the left over dries well, is quite stiff and not tacky, you have a good glue bond. If not? You have good grounds for suspicion that it might fail you.

Caution
Make sure you work in a well ventilated room as the glue does indeed comes in a rather strong chemical smell. Also, when you store the glue, make sure not to taint one another with each other as that will affect the chemical compound and affects the effectiveness when you use them in future. Basically, the two is to be stored separately and mixed only when use.


So, there you have it.... a little something on jewelry glue.


post signature

Read More...

Tuesday 14 April 2009

Glazed & fired

..................................................................................................................................................................................................................................................,.........
Work Room chat:
This is an ex gratia plug I'm doing for Uncle Ghee. =) Give Funky Pots website a visit to see what it's all about and if any one of you are by any chance just around the corner, better still. There's a £5.00 off voucher that you can download from the website to use. Come on down to Funky Pots for some pottery painting fun with your friends, family, kids or even loved ones while enjoying a mean cup of coffee and some homemade cakes. ;) Pottery painting is fun for all ages!

Ouh, and I'm occasional at the studio too and if you see me there, do say hi, yea. :)

..................................................................................................................................................................................................................................................,.........

I was refering to the golf bag pen holder bisque that I painted last week. It was finally glazed and fired in the kiln and here is the end product.


Tadah!


Well, not what I was expecting it to be. I wanted it to be darker though but then, obviously I haven't had enough coating of paint gone over it. I was told that the darkest shade the paint could achieve is with three layers of paint and obviously mine was only one layer.

I thought I have gone through three layers already because I remembered going through it three times but then only I realized it is only considered as one layer after each dry. Meaning, it is considered the second coating only after painted on a dried layer of paint. That was my mistake in not waiting for the firt layer to dry first before painting on the second layer, which is how the colour ended up so light.

Oh, well..... this is my first time working with this type of paint after all. So, I shouldn't have too high of an expectation anyway.

If you realized, the black stripe portion part was painted on rather messily. Well, truth is, I didn't finished off the painting myself. My aunt finished off painting for me since they were in a hurry to glaze and fire it together with the rest of the bisque.

Yes, pottery painting can be quite time consuming. Painting one layer took me almost 3 hours! Can you imagine how much longer it would take if I were to do it for three layers?

But then, to think of it.....it might not have been that much longer since I wasted some time the first time around trying to figure out the paint.

The thing about the paint for pottery painting is this.

The paint is very thick in texture and lighter in shade prior to glazing and firing. Hence, it can be a little mind boggling trying to gauge the colour match for a beginner like me.

Just take the red colour for example.

As you can see in the picture below, the colour of the paw print appears to be pinkish in shade prior to glazing and firing.


But after glazing and firing, this is the shade you get.


o_O!


I'll show you the other tile with the red background so that you can see how red the paint actually turn out to be.


Apart from that, it was indeed an interesting experience. Will definitely want to try this one more time and hopefully I'll get to capture every step of it and I'll even choose a smaller item to paint next time around!LOL......


post signature

Read More...

Thursday 9 April 2009

Funky Pots @ Westbridgford

..................................................................................................................................................................................................................................................,.........
Work Room chat:
I hope you like the new layout. I realize the changes weren't that great apart from perhaps, the sizes of the columns but I did try a new template but totally messed it up. Luckily, I had a backup of the original template but still it was kinda messed up when I upload them again. So, for now, I think I'll just stick to this layout until I figure out how. o_O

..................................................................................................................................................................................................................................................,.........

And so the past week has been one occupied with Funky Pots' branch studio opening in West Bridgeford which finally open its doors to customers yesterday. Weather was pretty good yesterday by the way, sunny and bright! :D

Everyone stayed up till very late the night before to put on the finishing touches to the new premise. We reached home about 1:00 am and I only managed to hit the sack around 2:00 am after washing up.


It was showering a little in the evening.


Everyone's working it out.....


Even Aunty Sandy came all the way from Derby to lend a helping hand.


Bottles and bottles of paints.


Shaunee and Vicki's masterpiece. They are both only 11 and 12 by the way.


Leaving their mark behind.


Funky Pots Westbridgford is finally open the next morning.....

I really like the interior.....very cheery warm and cozy. :)

You know it's good weather when people are only dressed in short sleeves with no bulky jackets and scarfs in sight! LOL......


The cafe area may be smaller than the one at Huntingdon Street but the kitchen here is much more spacious, erm, does that make any sense to you?


While everyone was busy with painting the sample pieces......


I couldn't join in the fun because I was here....


Doing some last minute printed work for the shop, and that's my blueberry muffin for lunch.

But, I'm not to miss out on the fun. =P

I managed to finish up with the printed work just in time to join in the fun! Heheh!

A golf bag pen holder bisque.

I didn't specifically chose to paint this but Uncle Ghee's wife put some 5 of them out for us to paint. I was the last to paint and spend almost 3 hours painting it.

Wanted to paint a realistic looking golf bag rather than a cartoonish one, like what the rest did. Ahaks! =P

So, this was what I eventually came up with......

Tadah!

I've painted it with the creases and everything but I don't think it shows much in the picture. Even in real the colours are quite pale. It is only after glazing and firing in the kiln that the colour will show more prominently.

It was easy to cheat paint the creases here actually since the bisque itself come with the creases and all. All I had to do was only to paint a darker shade on the crease area. Unlike like say, on paper or 2D medium, where you actually have to imagine the creases.

It's not exactly done yet. There's still some stripes thingy that I haven't painted yet as you can see from the picture. I'll most probably go get it done tomorrow when I drop by West Bridgford. Can't wait to see how it will turn out after glazing and firing in the kiln!

p/s: Just in case some may be wondering if I purposely came over for Funky Pots Westbridgford's opening, well, I did not and neither did I plan it. It was just a coincidence. =P LOL......


post signature


Read More...

Related Posts Plugin for WordPress, Blogger...