..................................................................................................................................................................................................................................................,.........
I recently bumped into this article by Kerry Bogert of Kabs Concept about the dilemmas relating to custom orders . Frankly speaking, I couldn't agree more with what she wrote. I don't know about you but I somehow could relate to what she wrote which has also been my custom order dilemma. In Hamlet's words, to do or not to do.....that is the question..... o_O
..................................................................................................................................................................................................................................................,.........
Another wired heap pin alternative. ;)
I was thinking and experimenting with the wires, wondering whether if I could somehow come up with one of those flat end head pins.

The important feature of a flat end head pin is that they finish the end flat. Unlike a ball end head pin which finishes with a portruding end.
 |  |
On my first try....
Slide my bead in.

Made a loop with the round nose plier.

Then, I turn the loop at a 90 degrees angle to form the flat pad.

Slide the bead back down.

Yes, I manage to finish the end flat but I wasn't happy because it looked odd. Because of how the loop was formed, the wire stem is connected to the 'flat end' right at the outer rim, giving it a very odd looking end.

The wire stem should start from the middle of the ‘flat pad’ so that your bead would sit nicely at the center.of the wire.
Also, since the tip of the round nose plier was quite big, the 'flat end' formed from the loop was also quite big lor.
Hhhhmm...... there must be a way to go around this. So, I ditched the round nose plier and opt instead for the chain nose plier. The thing is, my chain nose plier has got a sharper tip than my round nose. o_O

I tried a couple of methods and finally might have been able to come up with a wired flat end head pin.

So, if you are interested, this is how you can do it. It's quite simple but yet a little tricky at the same time. Ok, maybe I'm the only one who find it a little tricky. Anyway, continue reading to find out if its tricky for you or not la. :)
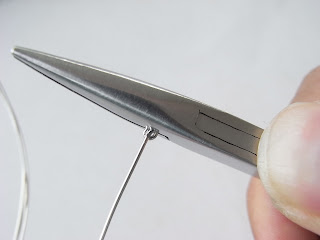
With the back of the round nose plier, grip onto the end of the wire. There shouldn't be any wire sticking out because you really want to make sure that you are gripping right at the edge.

Now, make a small turn upwards at the end of the wire. Just a little will do. The reason we are doing this is to prevent the unsightly straight end when we are making the loop for the flat end. Errr, get it? Nevermind……next time ya.

Next, grip onto the end of the wire with the tip of the chain nose plier. We want to make a really tiny loop, as tiny as possible and this chain nose plier has got a much sharper tip than the round nose plier.

Ok, this is where the tricky part starts.
You are going to make a 270 degrees (approximate la!) turn to make a loop. However, while looping the end, you are not just looping it parallel to the wire but pulling it downwards at the same time so that you end up with a spiraling-like effect. I hope the pictures are self-explanatory enough.

Grip onto the bottom spiral end, like this.

You might realize that the grip is a diagonal one due to the spiraling.
Now, turn the spiral end so that is perpendicular to the wire forming a 90 degrees angle. You will be holding you chain nose plier horizontally across right now compared to the slanted position earlier.

How this is different from the mere loop and 90 degrees turn we made earlier on is how we are now going to make the wire stem end begins from the center inside of the loop rather from the outer rim. You’ll see in a while how I’m going to do that.
I’ll show you how the spiral loop looks like from another angle.

What you are going to do next is to fold down the spiral such that the wire is going to fill up the space in between the loop forming some kind of ‘flat pad’.

Press them together with your chain nose plier.

The way we are pressing it together is such that for the wire stem to fill the gap between the loop so as to form a ‘flat pad’.

Now, this is how the wire end is going to ‘rise’ from the centre of the ‘flat pad’. ;)
With your chain nose plier, grip just right at the edge of the folded part.

Then bring the wire end up like this.

Do you see how the wire end is more centred from the ‘flat pad’? ;)

Slide your bead down.

Let’s make a close up comparison with the earlier plain loop one that we made.
 |  |
And a comparison with the commercial ones....

See? ;)
Just a little thought of mine. :)


1 hollers:
Thanks Wendy Sue, this has been a big help.
Post a Comment