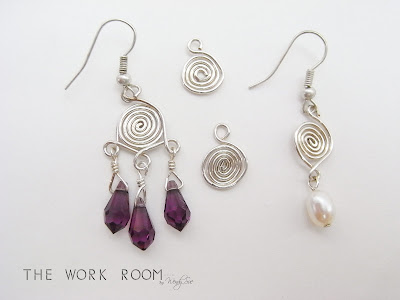
p/s: I'm breaking this post down into two parts because I realized I'm taking a whole week already just to finish this post alone! With a day job, I can only manage with a little time each day for this. :/ .... *sigh*......
Let's talk about spirals now, shall we? ;)
Right, I figure one of the ways of which I might be able to draw your interest to the spirals is maybe by making good use of it to make the earrings above.
Considered one of the basics in wirework, so you kinda GOT TO know them. :P
I'm sure the above picture looks very familiar. I'm pretty sure you would have come across them when buying findings in one of your local bead shop. It is sold as connectors.
To be honest, I'm not very into spiral connectors. I mean, really, if you are going to fork out money to get something, why bother getting something which you can make yourself. Of course, depending on circumstances, it might say sometimes be more time and cost effective to buy them ready-made.
But then, if you ask me, sorry to say this but I seriously do not think spiral connectors itself is all THAT attractive lor!
But, but, but...... when you spunk them up like this.......
Now, that's a different story!
Just a plain spiral connector like that..... B.O.R.I.N.G.
But, when you put many of 'em together..... very funky!
ok, not funny :/..... oh, well....... *sigh*.....
Okay, at least that's what I think. You may or may not agree with me. :P
But should you happen to agree with me, you'll realize that the spiral connectors available for sale in the market normally only comes with one loop which doesn't quite allow for connection in too many directions.
Don't you just hated it when this happens? Well, I do! One of my gripe when it comes to buying findings is how sometimes you want the connection to go one way but the ready-made loops only allow for the connection to go the other way. Then, I'll be -_____________-
I guess this is when some say your creativity comes to play to work around the restrictions. But still........
Isn't it much more fun when you can have full control? :P
And by making your own spiral connectors, you get full control!
And, I'll show you how. If you're interested, of course! :P
Alright, this is what you'll need.
You can really use any thickness of wire. It doesn't really matter although you might need to be careful when using thinner wires like 26 ga or 0.4 mm because it's more brittle and prone to breakage. Well, not to say you can't but gotta be more careful.
Well, the first you will need to know is the basics of making spiral.
I still remember the first time I made a spiral. Well, it didn't quite turn out right because I made a mistake of coiling the wires with the round nose jaw in between the wires which resulted in gaps between each coil. Well, it was my first without reading up on how it should be done. Heheh!
So, if you also have not done it before, this is how you should be doing it.
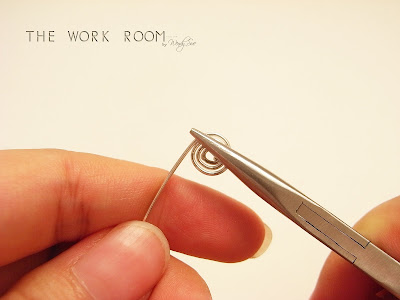
Grip onto the edge of the wire with the chain nose pliers.....
To make a small loop like this.
Then, with your chain nose pliers..... ok, you may still stick to the round nose if you wanted to..... and grip onto the loop like this.
And start coiling the wires around the loop.......
.... by pushing the wire closer and around the loop you made earlier on.
Continue coiling until you're happy with the size of the spiral!
Next, to make the loop for connection!
Cut off roughly about 1 cm from the last spiral.
Make a loop.
And you're done! =D
Now, if you look at the two spirals below, you'll notice that the difference between the two lies in the centre of the spiral. The one on the left has a closed loop while the one on the right has a open loop. Well, there's no right to wrong for it but these are the two ways you can make your spirals.

All the above shows you how to make a spiral with an open loop at the centre. If you want to make one with a closed loop, the difference is in your beginning loop.
This would be how you're going to make that beginning loop.
Instead of a roud nose pliers, you're going to use a chain nose pliers to make somewhat of a small bend.
Like this!
Then, you're going to squished it flat......
....... to become this.
And just continue with the coiling.
And so you see, the difference in the two lies in the beginning loop!
Okay, I'll continue in the next post....tired already. :P
Part II here.


0 hollers:
Post a Comment