About The Work Room

The Work Room is the Creative Journal of Wendy Sue where she shares her creative journey in all things handmade. The Work Room also offers an alternative to your typical jewelry making workshops. Scroll down to the end of the page to see how you can learn to make your unique piece of artisan jewelry online.

Tuesday 27 July 2010

Everybody, meet Derek.


Everybody, this is Derek. :)


Looking cool there, huh? ;)


I got to know about Derek when a friend in Facebook liked his Facebook Page link. And when I browse through the page, my eyebrows just raised! Well, not in a bad way but more like surprised!


Very cosy looking studio.

You see, Derek's studio offers not only beading workshops but also lampworking and silversmithing! And to think that I actually travelled thousands of miles across the sea just to learn the latter two only to learn AFTER my return that both workshops are available just behind my backyard! Well, not literally my backyard, but you catch my drift.

I didn't realized such a place existed in Malaysia. I swear I've made a very thorough Google search before deciding that England was probably the next best place if I want to learn those two since I'll be going there for a break already. I've even checked up on Singapore ok and there was none, 'ilek', nil.


His studio also has strands of beads available for sale.

Well, true enough. He only had this studio a little over a year. That's around the same time I left Malaysia.

But when I learned that he has been doing this for 10 friggin' years already, I was like "C'mon, you kidding me, right?" Turns out, he wasn't.  o_O I mean, don't you think he looked waaay too young to have been doing this for a decade already? LOL.....=P

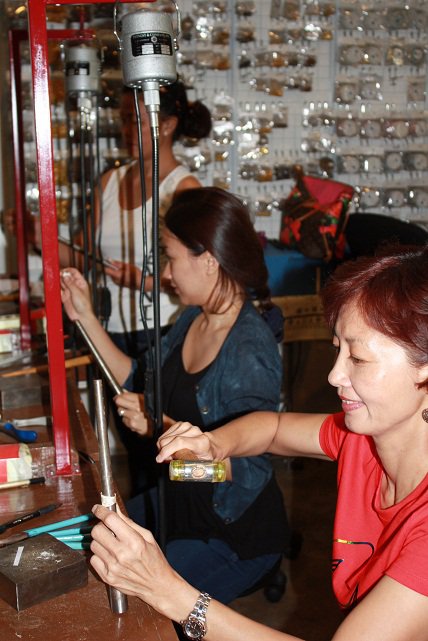
Another thing that struck me was how well-equipped his studio is. To the point that it was rather impressive if you ask me!


It's rather common to see bead board in beading classes but it's not often that I see them with worklights. If you have done beading before, you'll realize what a huge difference proper lighting can do with your work and at the same time not to strain the eyes. And if you've done enough beadwork, you should be able to tell the difference between working under sunlight and normal light. Apart from the fact that the classes are conducted indoors and hence the dimmer lighting as I presumed from the picture but if those two table lamp I see there are daylight lamp, I'm even more impressed cuz I know thes thing don't come cheap!

I'll tell you why daylight lamp are the best. Well, basically the light simulate that of natural sunlight and thus reduces eye strain and glare ensuring that you work in optimal comfort.

How thoughtful!


Looking at this picture sure feels like deja vu!


Even his silversmithing workbench appears to be very well equiped with all the necessary tools. Do visit his silversmithing photo album in his Facebook page to see more. And if you browse through the description of the course from his website, I dare say that it does sound like one hella-vu comprehensive course!


Even his lampworking work station is just as impressive! From the picture I see, I'm guessing it's a 4 seater work station equiped with the micro torch and all the necessary tools.


Another interesting workshop conducted by the studio is the beaded lamp course.


The luxury lamps. LOL.... XD I think bead lovers would have loved to have this in their living room or bedside table. Functional ornament, I call them. :)


Totally awesome with lights on, isn't it?

Check out this video below to see Derek 'live'.


You guys know what really caught my eye in the video?

This!


Why didn't Diana or Sally tell me that there was such a thing?!


Then I think I would have a better chance of scoring with a round bead despite being only a beginner lor!


*Runs like an ostrich and buries my head in the sand AGAIN*


p/s : I haven't had the opportunity to visit Derek's studio. All Derek T Creative Studio and Gallery are taken off directly his Facebook page, with his permission of course.

p.p/s : You know, if you ask me, I think it's better to take up these courses that are broken down into a few segments running over a span of time rather than 2 full days crash course like what I did. There's simply just too much information to be able to actually digest and take them all in 2 full days. The misfortune I experienced with my Beginner Silversmithing course was an example.

p.p.p/s : Derek's studio is in Plaza Damas, at Sri Hartamas. Lucky you people who live near there!


post signature

Read More...

Tuesday 20 July 2010

TWR051 Twinkle Star Pendant Tutorial


Twinkle twinkle little star~

How I wonder what you are~
(well, I used to wonder when I was a kid but now I know that it's just some other planets out there! LOL.... XD)

Up above the world so high~
(Cuz you're in outer space, that's why! The milky way, they call it?)

Like a diamond in the sky~
(Ok, I know now you twikle not because you're some precious gems but due to the surrounding air :P)

Twinkle twinkle little star~
How I wonder what you are~
(Uh-uh, now I wonder no more, I wonder no more..... ;P)


*Sigh*...... oh well, the reality of growing up and innocence of a child. :)

Alright, my silliness aside. =P


Tools & materials used:
  • (60) 4mm Swarovski crystal bicone
  • Fishing line/Monofilament/Supplemax or equivalent
  • Scissors

Number of steps: 11
Page count: 6


IMPORTANT NOTICE:
  1. This tutorial is in PDF format and you will require Adobe Acrobat Reader to open them.
  2. File size: 300 KB
  3. The PDF file will be sent to your email address registered with PayPal within 24 hours or less.


PLEASE DO NOT DISTRIBUTE, LEND OR COPY. DO NOT MASS PRODUCE. PLEASE ALWAYS GIVE CREDIT TO THE DESIGNER. THANK YOU FOR RESPECTING DESIGNERS' COPYRIGHT.


nb: Prices may be subjected to change without prior notice.
Malaysian buyers, please contact me by email (atelierworkroom@gmail.com) for quotation in RM and payment by local bank transfer.


post signature

Read More...

Thursday 15 July 2010

All about spirals! Pt.2


Part I here.

Ok, a continuation of what I did not finish off. :P

Erm, well, nothing major, really. Just to share with you how the above two pairs of earrings was constructed.


Right, let's start with the one on the right. I guess it's for those who like it short ans sweet. :)

You'll soon realize that when you make your own spiral connectors, you get to decide on the point of connection i.e. how many loops you want and where. So, in this case I made two loops at the two opposite ends to one another. One for the earwires and the other for the earrings dangle. It would be rare if not impossible to get spiral connectors with the loops selling in the market. So, make your own!


Simple. This is how you do it.

For the first one on the left, start like how you would with a spiral.


Then, you will make your first connecting point by making a loop along the spiral edge.
With your round nose pliers, grip onto the wire end but keeping them close to the spiral.


And make a loop.


 You might want tp flatten and reshape the wires with the help of a chain nose pliers.


Still gripping onto the spiral, comple the last coil and cut off the excess wire, leaving just enough for you to make a loop.


Position wise, bear in mind that this loop should be on the direct opposite from the first loop you made earlier so that the spiral hang more symmetrically.


There you go! ;D

Now, if you like to make a chunkier connector, you can make the spiral bigger so that you can have more connecting loops around the edge, which in turn will allow you to attach more beads. Great for a chunky chandelier earrings base! This is what you can do.

After making the first loop like what you did earlier on........


And continue with the second.....


and third connecting loop.


But of course, you may make it with more loop than this. Just bear in mind the spacing between each connecting loop and the more connecting loops you want to have, the bigger the center spiral must be to accomodate for the number of connecting loops you want to have.

Finish it off like how you did with the earlier one. Again, just bear in mind on the position of the loops as it will affect how it eventually actually hangs.


But then of course, if you prefer something funkier and freeform like the ones below, this is what you do.


What you do is to start with an open loop.


And then, instead of coiling each layer of wire close together, you leave a gap between each layer of wire by placing the round nose pliers between them.


And make a turn each time you want to create an angle.


Continue until you are happy with the size of the spiral and finish it off the same as before.


That's all about spirals, folks! Thanks for reading! =)


post signature

Read More...

Wednesday 7 July 2010

TWR050 3D Cross Pendant Tutorial


Learn to make this 3 Dimensional cross pendant using only 1 type of beads of the same size. I used 3mm Swarovski bicone here but feel free to substitute it with any other beads of your choice.


Just bear in mind that the bigger the size of your beads, the bigger the cross pendant will be.


We will be constructing this cross pendant 3 Dimensionally in which case you'll only be using the same one thread from beginning to end.


Tools & materials used:
  • (84) beads of the same size of your choice
  • Fishing Line/Monofilament/Supplemax or equivalent
  • Scissors

Number of steps:   58
Page count:   23


IMPORTANT NOTICE:
  1. This tutorial is in PDF format and you will require Adobe Acrobat Reader to open them.
  2. File size: 1.20 MB
  3. The PDF file will be sent to your email address registered with PayPal within 24 hours or less.


PLEASE DO NOT DISTRIBUTE, LEND OR COPY. DO NOT MASS PRODUCE. PLEASE ALWAYS GIVE CREDIT TO THE DESIGNER. THANK YOU FOR RESPECTING DESIGNERS' COPYRIGHT.


nb: Prices may be subjected to change without prior notice.
Malaysian buyers, please contact me by email (atelierworkroom@gmail.com) for quotation in RM and payment by local bank transfer.


post signature

Read More...

Related Posts Plugin for WordPress, Blogger...