About The Work Room

The Work Room is the Creative Journal of Wendy Sue where she shares her creative journey in all things handmade. The Work Room also offers an alternative to your typical jewelry making workshops. Scroll down to the end of the page to see how you can learn to make your unique piece of artisan jewelry online.
Showing posts with label Lampworking. Show all posts

Tuesday, 27 July 2010

Everybody, meet Derek.


Everybody, this is Derek. :)


Looking cool there, huh? ;)


I got to know about Derek when a friend in Facebook liked his Facebook Page link. And when I browse through the page, my eyebrows just raised! Well, not in a bad way but more like surprised!


Very cosy looking studio.

You see, Derek's studio offers not only beading workshops but also lampworking and silversmithing! And to think that I actually travelled thousands of miles across the sea just to learn the latter two only to learn AFTER my return that both workshops are available just behind my backyard! Well, not literally my backyard, but you catch my drift.

I didn't realized such a place existed in Malaysia. I swear I've made a very thorough Google search before deciding that England was probably the next best place if I want to learn those two since I'll be going there for a break already. I've even checked up on Singapore ok and there was none, 'ilek', nil.


His studio also has strands of beads available for sale.

Well, true enough. He only had this studio a little over a year. That's around the same time I left Malaysia.

But when I learned that he has been doing this for 10 friggin' years already, I was like "C'mon, you kidding me, right?" Turns out, he wasn't.  o_O I mean, don't you think he looked waaay too young to have been doing this for a decade already? LOL.....=P

Another thing that struck me was how well-equipped his studio is. To the point that it was rather impressive if you ask me!


It's rather common to see bead board in beading classes but it's not often that I see them with worklights. If you have done beading before, you'll realize what a huge difference proper lighting can do with your work and at the same time not to strain the eyes. And if you've done enough beadwork, you should be able to tell the difference between working under sunlight and normal light. Apart from the fact that the classes are conducted indoors and hence the dimmer lighting as I presumed from the picture but if those two table lamp I see there are daylight lamp, I'm even more impressed cuz I know thes thing don't come cheap!

I'll tell you why daylight lamp are the best. Well, basically the light simulate that of natural sunlight and thus reduces eye strain and glare ensuring that you work in optimal comfort.

How thoughtful!
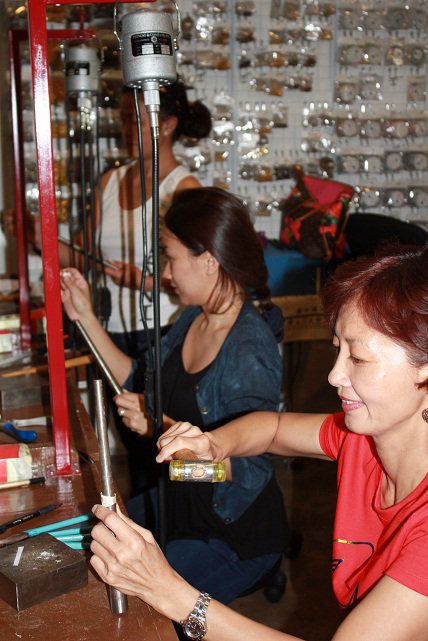


Looking at this picture sure feels like deja vu!


Even his silversmithing workbench appears to be very well equiped with all the necessary tools. Do visit his silversmithing photo album in his Facebook page to see more. And if you browse through the description of the course from his website, I dare say that it does sound like one hella-vu comprehensive course!


Even his lampworking work station is just as impressive! From the picture I see, I'm guessing it's a 4 seater work station equiped with the micro torch and all the necessary tools.


Another interesting workshop conducted by the studio is the beaded lamp course.


The luxury lamps. LOL.... XD I think bead lovers would have loved to have this in their living room or bedside table. Functional ornament, I call them. :)


Totally awesome with lights on, isn't it?

Check out this video below to see Derek 'live'.


You guys know what really caught my eye in the video?

This!


Why didn't Diana or Sally tell me that there was such a thing?!


Then I think I would have a better chance of scoring with a round bead despite being only a beginner lor!


*Runs like an ostrich and buries my head in the sand AGAIN*


p/s : I haven't had the opportunity to visit Derek's studio. All Derek T Creative Studio and Gallery are taken off directly his Facebook page, with his permission of course.

p.p/s : You know, if you ask me, I think it's better to take up these courses that are broken down into a few segments running over a span of time rather than 2 full days crash course like what I did. There's simply just too much information to be able to actually digest and take them all in 2 full days. The misfortune I experienced with my Beginner Silversmithing course was an example.

p.p.p/s : Derek's studio is in Plaza Damas, at Sri Hartamas. Lucky you people who live near there!


post signature

Read More...

Saturday, 8 August 2009

Glass Bead Making : Full Professional Grounding Introduction Class Pt. V (Final)

............................................................................................................................................................................................................................................................
Work Room chat:
Hhhmm, any suggestion to be inspired again? Haven't been able to create anything at all lately.... o_O

............................................................................................................................................................................................................................................................

Part IV,Part III, Part II, Part I

WARNING : ANOTHER IMAGE INTENSIVE POST AHEAD. :P

Phew! Finally! Bet 'cha wondering when will this EVER end, huh? LOL.....

Oh, well.... told you I'm long winded. :P

And so, the beads that we made were out of the kiln!

It appears that I was the only inept one in class.....cuz everyone else's beads are just as pretty! -_-


They were placed in a crock pot filled with vermiculite. I don't know exactly what vermiculite is but was told that it could be bought from Garden Centre, which is what they call nursery here. What vermiculite does is it allows the bead to cool slowly at a slower rate than room temperature. Well, some uses fiber blanket.


Before getting the beads off from the mandrel, soak it in water.


And the everyone was busy with their beads.....


And here's the bead from the demonstration


I took mine out from the mandrel but the edges were so bad that it would just cut through any thread that will be strung on it. -_-

If you can see the white one on the right, that's the 'dimple' effect which we should try to achieve.


This is not as bad as the one above.

But all hope is not lost because it is still a remedial situation. Although it would be impossible the make it into a 'dimple' (I think I'll need a miracle for that!), I was told I can however smoothen the edges by filing.

Well, of course we can. It just means more work only mar....... :P

So, the first step was to file even the edges with this filer. Sorry, can't remember what was it called already. It's this big piece of sponge with some sort of a steel wire netting on top and you basically just rub the bead hole on the steel netting.


And then, you just smoothen out the edges with a reamer like thingy tip on a dremel. It was quite intimidating using the electric reamer at the beginning because it moves so fast and the beads were so small.

Anyway, just to show you all the disastrous beads I made. Don't laugh, ok.

It's pretty ugly. (Hhhmmm...isn't that like a contradiction in term?)


I think these are what the English would call as absolute rubbish! I actually contemplated whether if I should show you guys. o_O


I like to save the 'best' for last. So, I'll show you the broken pieces first.


These were from the first day, before lunch, when I was absolutely clueless about annealing. Apart from the blue with black spots one which cracked during operation, the rest actually came home with me in on piece. Only when I took them out yesterday that I realized they were broken already. Unfortunately, I didn't took any picture of it when it first came home with me to proove that they were actually in one piece. :/

Bottom line is A.N.N.E.A.L.I.N.G.


And these.......


were made during the last few hours of the course. We were advised that if we want to make anymore, to just make small ones so that we could just plonk it into the vermiculite and hopefully they small survive since there wasn't enough time left to anneal them in the kiln.

So, I made these really small donuts, which is the small donut that you first wrap on the mandrel. Four of them came back in one piece with me. Three survived but not the one on the left because as you can see, it cracked.

Lesson for today? A.N.N.E.A.L.


And the beads that survived?


*Runs like an ostrich and buries my head in the sand*


And to embarass myself further, I'll show them one by one to you.


These are the plain ones that I made. As you can see, the white one on the left is more presentable and looked more like a donut bead than the one on the right. That's because that was the first bead I made and I had Diana guiding my hands. Thereafter, everything was a disastrous downhill!

And now, you know what's a 'dimple' on a bead.

And these.....


.... are supposed to be gravity beads (I think!) where you add colours on the bead and fire them together into a molten state and turn the mandrel around and around fast and you'll have the gravity pulling the molten glass downwards and turning action going on and get the colours all mixed up in a swirl.


This is supposed to be those flower patterned bead which I of course, failed miserably!


I've always wondered why is it that some glass beads I buy has this greyish core at the hole. Now I know what they are! It's the bead release powder. You can't see it when the glass is dark or opaque but it is evident on translucent glass like these.

Like I said, I save the best for last.

These are just some of the ones that were made by Diana and Sally during class and was alotted amongst the students to share.

*Sigh*... the apparent difference between a pro and amateur beginner.

Thing is, I don't even remembered seing some of the demo for some of these beads in class! LOL.... Yes, it was definitely THAT much info to digest in two days!

But anyway, I'll show them one by one to you and only comment on it when I can.

This uses the same technique as the one earlier on.


I have absolutely no idea what technique was used for this one but it's amazing! I can only tell that there was encasement involved.


Gravity bead. There's a whole bunch of crazy colours going there!


Some crazy skills involved here! No idea how it's done but you basically have purple flowers with green bushes of leaves behind. AND in colour tones! The bead is the smallest one too. About 12 mm I think!o_O


This is quite a simple one. Blue care encased with clear glass and the white on clear twisty on the clear.


And my favourite amongst them all?


This!!


This involves A LOT of work!

As you can see, the pink flowers look sunken inside the bead with the green flowers right behind it backed by this colourful wall.

Now, I remember seeing how this was done.Twisty core encased with clear and then first later of green flowers. Encased with clear again and the pink flowers and then encased with clear again. If I remembered correctly!

In the bag was also these bits of twisties.


Can you tell which was used for which?


post signature

Read More...

Thursday, 6 August 2009

Glass Bead Making : Full Professional Grounding Introduction Class Pt. IV

............................................................................................................................................................................................................................................................
Work Room chat:
Ways to wrap a teardrop bead has been published and the file can be downloaded here.

............................................................................................................................................................................................................................................................

Part V,Part III, Part II, Part I

WARNING : IMAGE INTENSIVE POST AHEAD :P


Some of the beads I made. Not very interesting, I know. -_- But considering it was my first try, just close one eye la.


Like what I've said earlier on, I find lampworking to be a very technical craft. One of the problems with this craft that I was anticipating even before I've had a hand at it was with the coordination. Like you've seen in the video and pictures that I've posted earlier on, you'll see that you need both hands to work on it simultaneously.

I suspected I was going to have a problem since coordination is my shortfall. Well, not because of an inherent trait, mind you. :P


It can be quite intimidating working with fire for the first time. o_O


It was due to the brain hemorrhage I've had which have left the left size of my muscles a bit weaker compared to the right. So, basically the imbalance in muscle strength somehow contributed to the coordination problem for me.


It may look simple but it sure wasn't easy to cover a strip of glass on the mandrel to form the base for the donut bead, ok!


What would normally the case is to hold the glass rod on your dominant hand and turning the mandrel on the other. Darn! I knew I was going to have problem with turning the mandrel with my left hand.


But once you get a hang of it... it's kinda fun to see the glass turned into molten glass but it can be difficult to control the liquid form!


True enough la, I was struggling a bit throughout the operation. Speed was also a slight problem for me. Well, you need not move fast to get the job done. Just that my left is relatively slower than normal lor. Sometimes, I get a bit impatient with my left that I only let my right do all the job! But you can't do that in lampworking though cuz you do need BOTH hands for the job! But it did cross my mind that lampworking might be good occupational therapy for me. You know what they say, practise makes perfect! It's definitely much more fun than those physiotherapy exercises that I've had to do. My physiotherapist is so gonna agree with me on this! LOL...... If only lampworking wasn't so expensive to begin with.... :/

Anyway, irrelevant rant there.

As I was saying, yes. So, basically, the two full days was actually packed with demonstrations of techniques to create all the designs on the bead. Well, not ALL but the beginner ones. Although it was only demonstrations of technique one after another, it was interesting because after those demonstrations, you'll go like, "aaaaahh, so that's how they make those beads." You can, from then on, more or less figure out how a certain bead is done.

Well, unlike how you normally see a piece of jewellery in the mall and could figure out how it was done and can more or less go back and replicate one for yourself, glass bead making is unfortunately the case. It's a lot about a matter of skill! Although you may be able to figure out how it was done, it's not something that you can just go back and replicate the same. Well, not for beginners at the very least. The learning curve does seems to be much longer, although some people do seem to have a knack for it, like one of the girls from the class! o_O

Because there were like so many demonstrations, I didn't take pictures of all. It was just waaaaay to many! I'll just post a few.

Technique wise, the class started with making a teardrop and stringer. Stringer is thin strips of glass that are used for decorating the bead. Now, these two were peanuts. Very simplie and straightforward. For teardrop, you just kinda melt the glass and then let gravity do the job. As for stringers, you just melt the glass and with a tweezer, pull a chunk of the molten glass away from the fire and as the glass hits room temperature, it stiffens up to thin strands of glass.


So, I felt very good. I thought, well, it wasn't really as hard as I was expecting it to be. And boy, was my confidence shor-lived!

Next up, the twisties!


Twistis are also used for the decorating job but like the name suggests, it's two colours or more twisted together to make strips of thin glass for decorating.

Now, then's when I began to struggle. Why? You probably guessed it right. It's the use of both hands!

Like you see in the picture above, you basically stick the ends of two different colours of glass rod together and melt them into molten glass. Then you twist the two rods in opposite direction as you pull the two rods apart.

You twist them because you need to get the two colours intertwined with each other and you need to pull them apart because you need to turn them into thin long strips.

Oh, boy! You have no I.D.E.A.


Stringers and twisties that I made.


And these.... by the pros. So obvious, isn't it? LOL.....

Okay, I'll show you one of the demonstrations in making a feathered cylinder shaped bead.


First, wrap a small donut bead on the mandrel. The small donut is like the core basic in glass bead making just like how making a loop is in jewellery making. How you wrap the small donut will determine the hole of the bead. Basically, the glass need the wrap 'roundly' around the mandrel because if the glass spreads out flat at the edges, you will end up with sharp edges which will cut through any thread you string through the bead. It's what they call to achieve a 'dimple'.

Emm, I don't know if this makes any sense to you but I'll explain again in the next post with pictures.

I always have a problem in getting the small donut right!

Anyway, the greyish thing you see on the mandrel is the bead release. Well, you need to coat the mandrel with the bead release before adding any glass to it so that the glass won't stick to the mandrel and you can release the bead from the mandrel later on.


Decide how big of a bead you want your bead to be and make another small donut on the other end. The length from one donut to another would be the size of your bead.


Then, fill up the gap between the two donut with more glass. The reason why it's done this way is to have the two donuts as the guide so that you won't go beyond the boundaries which is so likely to happen when the glass melt. Trust me, it sure ain't easy to control molten glass. Especially not when gravity, who has the upperhand over you!


'BBQ' it a little. LOL..... There's a reason why the mandrel is now hold vertically when all the while it was being held horizontally to only torch one of the end. I'm not sure if I remembered it correctly, or I remembered it at all! But... I think it was something about not wanting to melt the whole bead because in a molten state, the glass runs about and gravity will pull it downwards distorting the shape of the bead and trying to get the 'dimple' at the end.

Erm, yea....told you it was a bit technical.


Smoothen it a little on the graphite pad and this is what you finally get! Graphite pad is the black piece of block on top of the burner that you see in some of the pictures above. It was mounted onto the torch and a tool used to shape the bead. They've also got a hand held one.

Now that you've got your core bead. It's time for some creative fun! Which I think is where the fun begins and also the most difficult part since it involves very intricate detail work.


Wrap the twisty that you made earlier on around the bead.


Fire the entire bead to melt the twisty into the bead.


And this is what you get!


Now, very quickly and while it's still warm, get a rake to 'feathered' the twisty out.

And that's how they make those feathered bead. It's something like how those patisserie chef make those spider web from chocolate sauce, isn't it?

Anyway, I'll show you the finished bead as well as some other in the next post.

There was also one demonstration that I just cannot not mention!

A dragon bead!! LOL....yea, like how cute is that?

It's not part of the actual content of the class. They showed us some books and Sally asked what demonstration would we want to see some more. One of the male student, well, the only male student actually, (So sorry, forgotten his name! I think it was Gerald if I'm not mistaken) saw a dragon bead in one of the books and said that he would like to see how it was done.

That, of course is nothing to Sally cuz she has done loads of frog beads before this. I just remembered that I saw a frog bead too when I was at the Patchings Farm Art Festival.

And so..... the demo begins....


Start with the spotty body.


Forming the feet.


Can you just see how small the bead is and how intricate of a work it is? o_O


Putting on a head.


And the eyes next.


Now, our 'lil dragon buddy can see you! XD


Sally was nice enough to put a piece of white paper behind so that I can capture a better picture.

How insanely cute was that!

Unfortunately, I didn't get to keep the dragon bead. :(

We draw a lot at the end of the day to share out all the beads made during demonstrations throughout the two days course and the dragon bead was not in the lot of beads that I draw.

Oh, well......

At the end of the day.....


My work station was just as messy as my mind was! LOL......


post signature

Read More...

Related Posts Plugin for WordPress, Blogger...