About The Work Room

The Work Room is the Creative Journal of Wendy Sue where she shares her creative journey in all things handmade. The Work Room also offers an alternative to your typical jewelry making workshops. Scroll down to the end of the page to see how you can learn to make your unique piece of artisan jewelry online.

Thursday 30 September 2010

TWR055 Pretty Bow Ring Tutorial


Learn how, with very few materials to make this bow motif ring with a rhinestone chaton montee at the center.


Montee are crystals that come pre-mounted in a metal settings with two stringing directions. I'll show you how you are going to make use of this two stringing direction to make this bow motif. 


This is a quick, easy and fun project to do, for beaders at all level! ;)


Tools & materials used :


  • (1) Swarovski 53200 approx 4mm rhinestone
    chaton montee
  • (2) 3mm Swarovski bicone
  • (4) 4mm Swarovski bicone
  • Size 11/12 seed bead
  • Fishing line/Monofilament/Supplemax or equivalent
  • Scissors


Number of steps: 13
Page count: 7


IMPORTANT NOTICE:
  1. This tutorial is in PDF format and you will require Adobe Acrobat Reader to open them.
  2. File size: 391 KB
  3. The PDF file will be sent to your email address registered with PayPal within 24 hours or less.


PLEASE DO NOT DISTRIBUTE, LEND OR COPY. DO NOT MASS PRODUCE. PLEASE ALWAYS GIVE CREDIT TO THE DESIGNER. THANK YOU FOR RESPECTING DESIGNERS' COPYRIGHT.


nb: Prices may be subjected to change without prior notice.
Malaysian buyers, please contact me by email (atelierworkroom@gmail.com) for quotation in RM and payment by local bank transfer.


post signature

Read More...

Tuesday 28 September 2010

Make Your Own Toggle Clasp : Part II


Part I here.
Tips here.

Guess what? I'm not too tired for the day yet and so shall continue with Part II of the DIY toggle. ;)

Alright, on with the T-bar! Erm, pretty straightforward, if you ask me.


I cut out about 12" long of wire. Well, this is of course no hard and fast rule, it's just my suggested length for now. :)


 You'll need to measure the width of your ring to determine the length of the T-bar you will be making. Like here, I'll need to make it approximately slightly longer than half an inch.


I leave about 1" tail + slightly more than 1/2" for the T-bar length. So at the point of 1 1/2 " + .........


Make this. For a recap of how this is done, look here.


Measure about 1/2" from the loop for you to make the other loop on the other end. Remember that the loop on both ends sorta add to the final length as well. So, you'll need to take that into consideration


Make a right angle bend.


To make the loop on the other end of the T-bar.

You'll now have the two wires parallel and overlapping each other with the shorter end on one side and the longer one on the other.

This will be the frame of your T-bar.


You're going to wrap the longer end of wire around this frame to make the T-bar.

Grip onto the side with the shorter end  with your pliers.


And start wrapping around. You will begin wrapping from the neck of the loop.

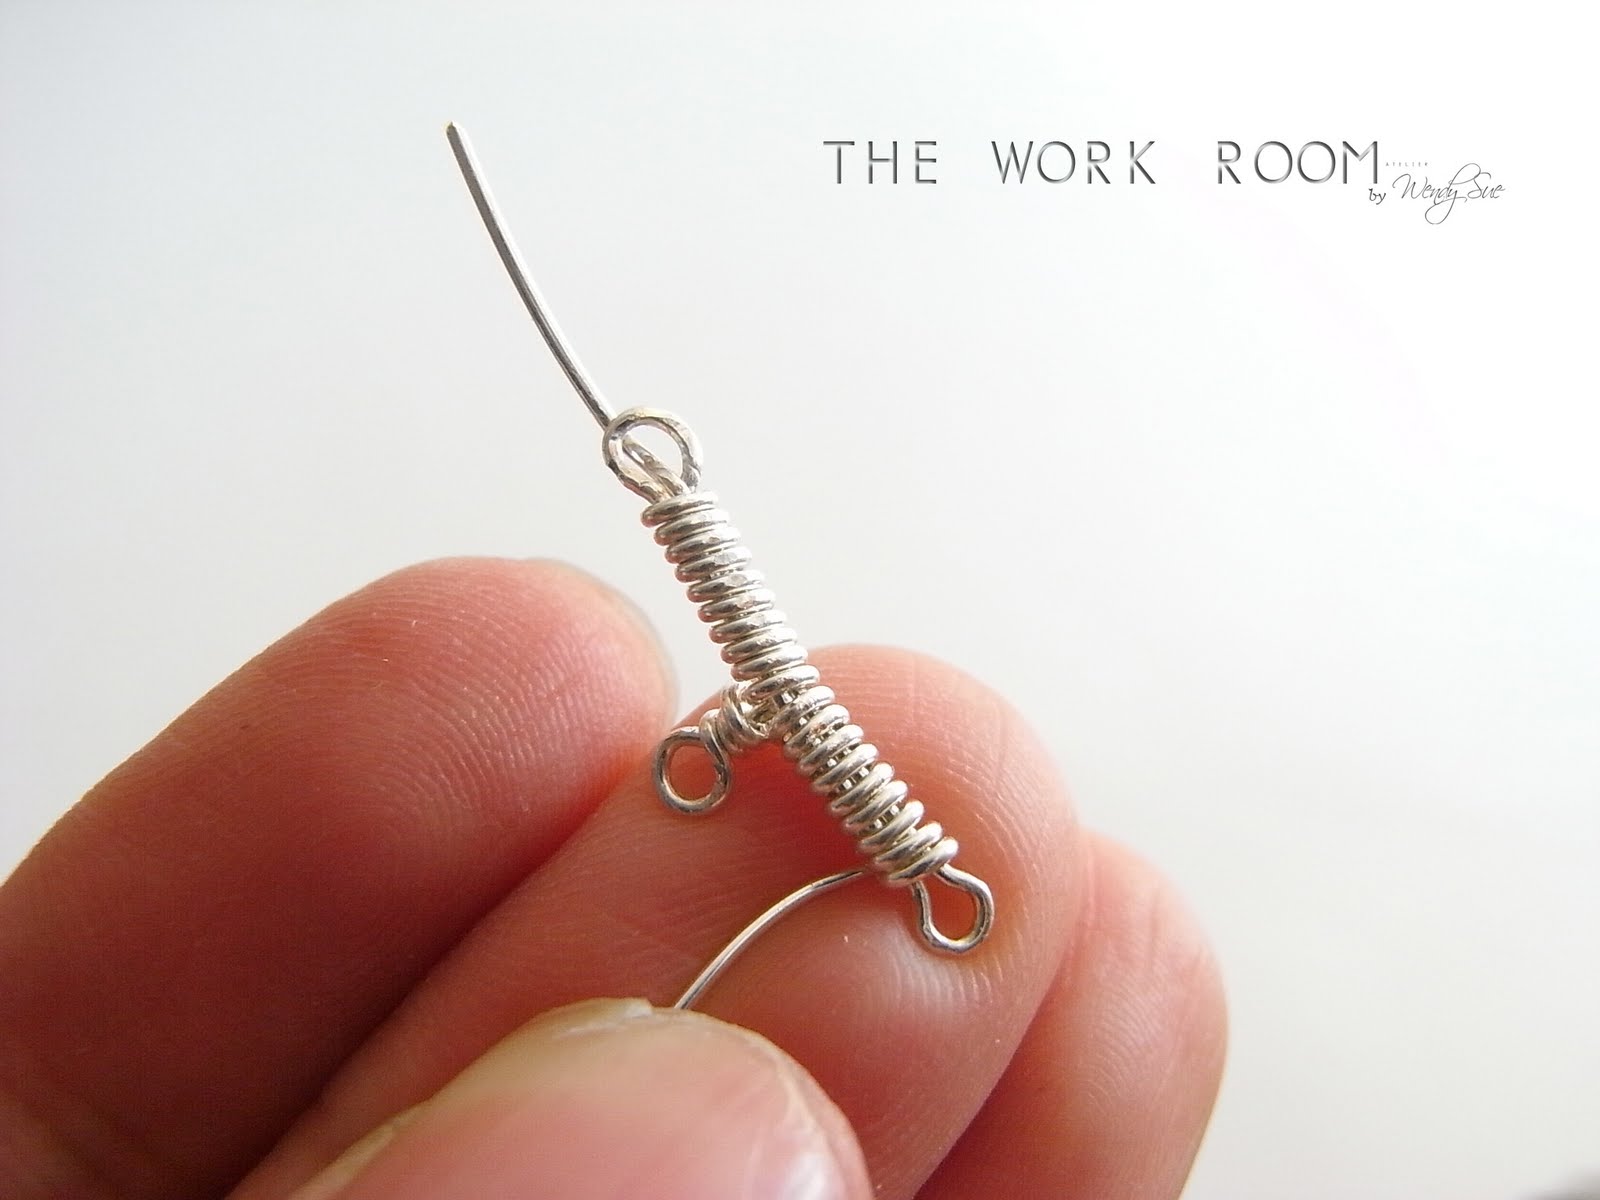
So, yeah, you basically have two loops at the two ends of the T-bar.


You would want to make the coils wrap as closely to each other as possible and to help with this, you can always make do with the help of the chain nose pliers to push to coils closer.


Wrap until you're half way through and stop.

Why?

Well, to form the loop for you to attach the T-bar to your pieces, of course!


Use the chain nose pliers to make a right angle bend here.

Now, if you have been following my blog, you may have read how I always prefer the chain nose pliers over the round nose pliers when making a right angle bend due to the precision factor.

I find round nose pliers always leaves a longer 'neck' compared to a chain nose due to the latter sharper's jaw, it gets closer to the base. 


And then, switch to the round nose pliers to make a loop.

Alright, some may find the switch between pliers a bit troublesome but oh well, that's my habit already..... :P


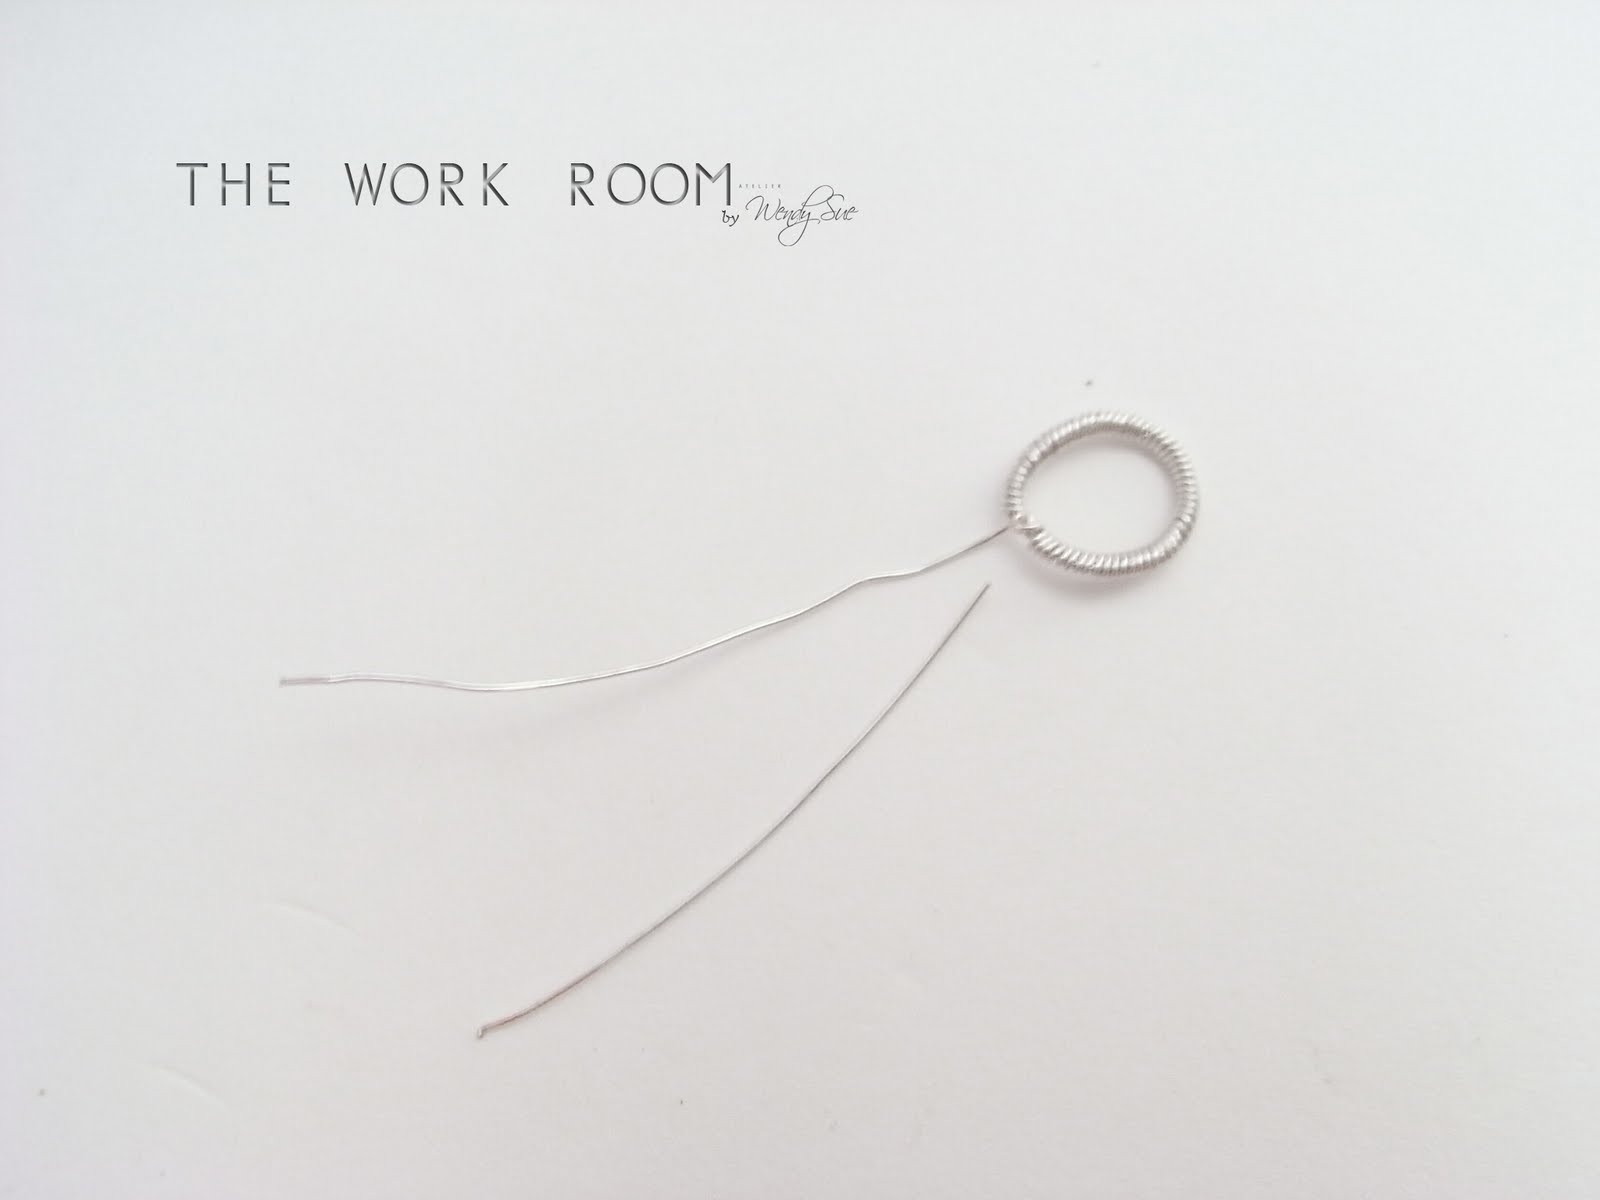
This is what you'll get. You can also loop it the other way and have the longer wire end pointing to the other direction,

It doesn't matter as long as it's a loop. :P


Grip on to the loop.....


And wrap the wire around the loop.

Yes, it's ultimately a wrapped loop. Depending on your preference, you may prefer a longer or shorter 'neck'. Longer neck would mean that you'll need to leave more space at the 'neck' for you to wrap more times around it or to get as close to the base as possible so you'll need to wrap less times around.

Either way, you'll need to have sufficient amount of wraps for a strong 'neck' and I reckon 3 times around should be good.


Once you're done with that loop, continue wrapping the bar. 

Just bring your wire up and around the bar again.


Now, you may find that there are gaps between the two halves of the bar due to the interruption at the center.

Fret not. All you need to do is to use the trusty (it never fails you! LOL..... ) chain nose pliers to press the coils closer together.


See?


Continue right to the end.


Finally, cut off the excess wire.


Do the necessary nip and tuck.


And same goes for the other end.

With that folks, you can go make your own toggle clasp already! =D

p/s: Check out Part I for the ring end here if you've missed it. ;)


post signature

Read More...

Monday 27 September 2010

Beading.com.my Final Storewide Sale!


Ok, final not as in closing down final "Final" sale but as in the final sale in 2010, yeah. :P In other words, if you miss this one out, you probably gotta wait until next year for their next sale. I know next year is only a couple of months away but if their next sale is gonna be in Sept 2011, well, you technically do have to wait for 12 months! :P

So, what are you waiting for? Head on down to check it out! =D

Just a quickie one here.

 I know it's been some time already since my last entry. Work has been a bit busy and tiring at the moment. I'm stealing some time off my lunch break to post this entry. I've got about half an hour to do this. So, let's see how fast I can type how much I can cramp in. LOL.... XD

Yes, as I was saying, Beading.com.my's sale.

Remember how I used to have a list of the online stores that I go to to buy my materials listed on the sidebar? Ok, no need to look at the sidebar. I said "used to" i.e was here but not now anymore. :P Some people ask me where did that list go. Well basically because  I'm now getting most of my stuffs from Beading.com.my that there just doesn't seem to be any need to look elsewhere.

Only for those odd items, I'll hit this eBay store. Otherwise, Beading.com.my is pretty much the "one-stop".

Got the above Labradorite from Beading.com.my. I haven't got the slightest idea what I'm going to do with them yet but they're just too pretty to turn now.

I've just got a knack of buying buying and buying but when it comes to using it, I have this slight nudge at the heart not to part with it! LOL...... Like a beads collector more than a jewelry maker when really, the practise should have been the latter!


Look at that 'flash' ! Seriously, I think the picture just don't do it justice!


If you're into gemstones, they've got more in store. And the best part is, they also ship worldwide! So, yes, everybody can buy! =D

Oh, did you know that Steve from Beading.com.my in collaboration with Emi Kaz is conducting Metalsmithing workshops also? Well, actually, they've got a lot more workshops available!

I think the inaugural workshop was held last Saturday on the 25th I think. I of course hadn't the opportunity to attend given the fact that I stay so far away from them. Mastura from whimsicalandquirky. blogspot.com attended and wrote a post about her experience. So, you might wanna go check it out.

Alright, lunch time's up! Gotta dash off now. I'll try to put up a more long-winded proper post later tonight IF I'm not too tired. :P


post signature

Read More...

Thursday 16 September 2010

Make Your Own Toggle Clasp : What to do


Alright, just a 'lil something to look out for here before we actually move on to the second part i.e. the T-bar.

I'm not sure if the picture above come across as clear enough but do you notice the difference between the two? 

Well, hahah, ok, apart from the obvious fact that the one on the right is not a perfect circle as compared to the left one. That's not what I wanted to draw your attention to despite being the obvious fact. :P

It's actually the thickness of the circle that I'm talking about. Now, if you look closely (alright, no need to squint your eyes :P) the thickness of the circle of the ring on the right is uneven as compared to the one on the left.

I'm not sure if I've mentioned this before but I couldn't find anything in the older post although I do have this deja vu feeling that I've talked about it before. Hhhhmmmm..... o_O

Anyway, re-telling a grandmother story won't hurt! :P

Alright, back to the main point.

What causes the unevenness begins right from the very first step i.e. when you were forming the base circle shape on the mandrel. It is important that as you wrap the wires around the mandrel, you should do so tightly and similarly when you twist the two wire ends around each other to fasten the shape.

This is so you'll get to circles of the same size, positioned neatly one next to the other.


Now, compare the one at the top with the one below.


It's when you try to wrap two different sizes of circles together that you get the unevenness in thickness.

What happens as you wrap around the circle is that any gap between the two circles will add on to the thickness .


Which is why it's crucial that you get the two sizes of the circles right.


So that as you wrap the two circles together........


You get thickness which are even throughout the circle.


Another thing I find about working with 0.6mm or 22 ga wires is that while it's easier to manipulate and work with, care must also be taken to not exert too much pressure when working on it, especially in areas where wires overlap each other.

Why, you ask?

This
.
.
.
.
.
.
.
.
.
.
.
.
.
.
.
.
.
.
.
.
.
.
.
.
.
.
.
.
.
.
.
.
.
.
.
.
.
.
.
.
.
.
.
.
.
.
.
.
.
.
.
.
.


Erm, well, fact is you do run the risk of the wires breaking if you're not too careful. Yes, you do need to be very careful. Oh well........ *rolls eyes*

So, what happens next? Fret not. It's all good and dandy! =D....... erm, provided you still have one wire end intact. If both wire ends breaks as well..... then I guess you'll have the use a little bit of imagination now, haven't you? :P

Let's see......hhmmm, you can still attach using a jump ring and turn it into some movable ring end I suppose. But in instances where you wires actually broke even BEFORE you finish wrapping the circle, well then, toss it away and start AGAIN and be more careful the second time.

But if you have finished wrapping the circle and with one wire end intact, no problem then! Just make a wrapped loop. Not gonna say too much here. They say picture speaks a thousand words. So, there you go!


Part I here.
Part II here.


post signature

Read More...

Monday 13 September 2010

TWR054 Crystal Cross Pendant Tutorial


Another variation of the cross pendant but this time with some added embellishments to "bling" it up! ;)


I used one Swarovski 53200 chaton montee here as it's focal bead. Any other 4mm rhinestone chaton montee would do just fine as well. If you still haven't know by now, montees are crystals/rhinestones that come pre-mounted in a metal setting with two stringing direction.


If you have difficulty looking for chaton montee, it can easily be replaced with a 3mm or 4mm pearl/round bead. It will be explained in the tutorial how the substitution takes place.


Tools & materials used:
  • (10) 6mm Swarovski crystal bicone
  • (9) 4mm Swarovski pearl
  • (8) 3mm Swarovski pearl
  • (1) Swarovski 53200 chaton montee
  • Size 11/12 seed bead
  • Fishing line/Monofilament/Supplemax or equivalent

Number of steps: 22
Page count: 11


IMPORTANT NOTICE:
  1. This tutorial is in PDF format and you will require Adobe Acrobat Reader to open them.
  2. File size: 388 KB
  3. The PDF file will be sent to your email address registered with PayPal within 24 hours or less.


PLEASE DO NOT DISTRIBUTE, LEND OR COPY. DO NOT MASS PRODUCE. PLEASE ALWAYS GIVE CREDIT TO THE DESIGNER. THANK YOU FOR RESPECTING DESIGNERS' COPYRIGHT.


nb: Prices may be subjected to change without prior notice.
Malaysian buyers, please contact me by email (atelierworkroom@gmail.com) for quotation in RM and payment by local bank transfer.


post signature

Read More...

Related Posts Plugin for WordPress, Blogger...