About The Work Room

The Work Room is the Creative Journal of Wendy Sue where she shares her creative journey in all things handmade. The Work Room also offers an alternative to your typical jewelry making workshops. Scroll down to the end of the page to see how you can learn to make your unique piece of artisan jewelry online.

Tuesday, 23 November 2010

Make Your Own Fancy Toggle Clasp : Part II


Part I here.


If making the fancy ring clasp for your own handmade jewelry was quick and easy, then making this T-bar for your own toggle clasp to finish off your bracelet or necklace is easy pea! ;)

Well, if you ask me, I believe this handmade fancy toggle clasp for your own bracelet or what not is perfect for beginners in jewelry making or just anyone who do not fancy the wire wrapping version since, admitedly, they are indeed more tedious work and more time-consuming.
So, if you want a quick and effective one, you can try this! ;)


Okay, to make the T-bar is really very easy. A pre-requisite is that you have to know how to make a wrapped loop. If you do not, you may want to visit here.

So, first thing first. Measure the diameter of your ring to decide on the length of your T-bar because logically, your T-bar needs to be longer that the diameter of your ring in order to 'lock' together.

As you can see from the picture here, my T-bar is approximately 1/2" in diameter. So, my T-bar should be longer that 1/2" but yet I don't want to make it too long else it might appear a bit chunky


I cut out approximately 5" long wire.


With my round nose pliers, I grip onto the center of the piece of wire.


And wrap the wire around the nose to form this kind of loop. Do you see a 'T' forming now? 

Note that the two ends of the wire are level to each other.


Now, twist both wires around to secure their position. If you would like the 'neck' of the T-bar to be longer, you can of course twist the wires around more than once. (See how much fun it is to make your own jewelry findings? You can have control over pretty much everything!)


This is roughly how it should look like now.


Now, to complete the arms of the 'T', we need to do a little calculations.

Alright, we know that the diameter of the ring is 1" long. Technically, we'll need to measure the arms to be more than 1" but fact is we are going to retain the length of 1".

Why, you ask? How can the two lock when they are of the same size. The T-bar would have easily slip out from the ring.

But here's one thing you have probably forgotten. The loop at the center and ends (where I'll show you hotw to finish it off), all add some length to the T-bar. To ignore this fact might end you up with a much longer T-bar than anticipated. Therefore, it might be a good idea to retain the size and let the additional work naturally add length to it,

So, dividing the full length into 2, you'll need to measure 1/4"on each end.

I won't be adding on anymore measurements to it because by the time I end each end with a wrapped loop, it will inevitably add on to the measurements, which is why I'm adding beads on each end at 1/4" length. 
I


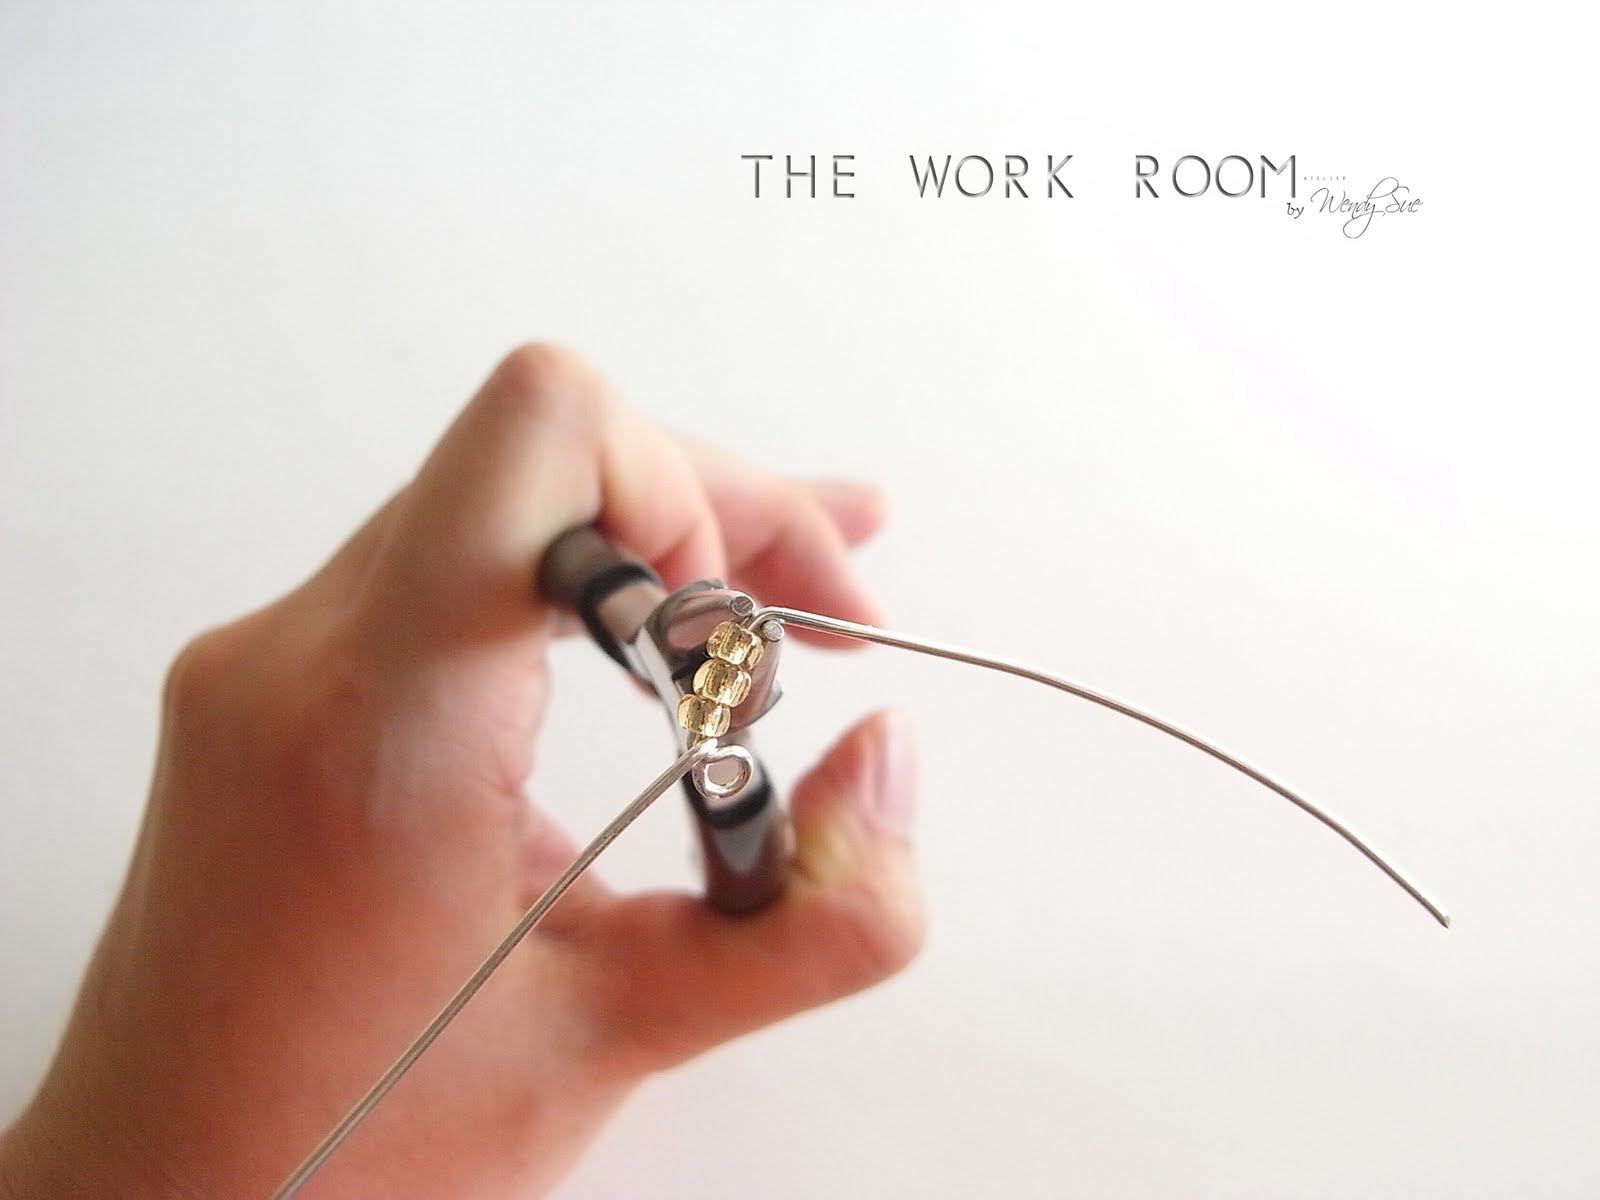
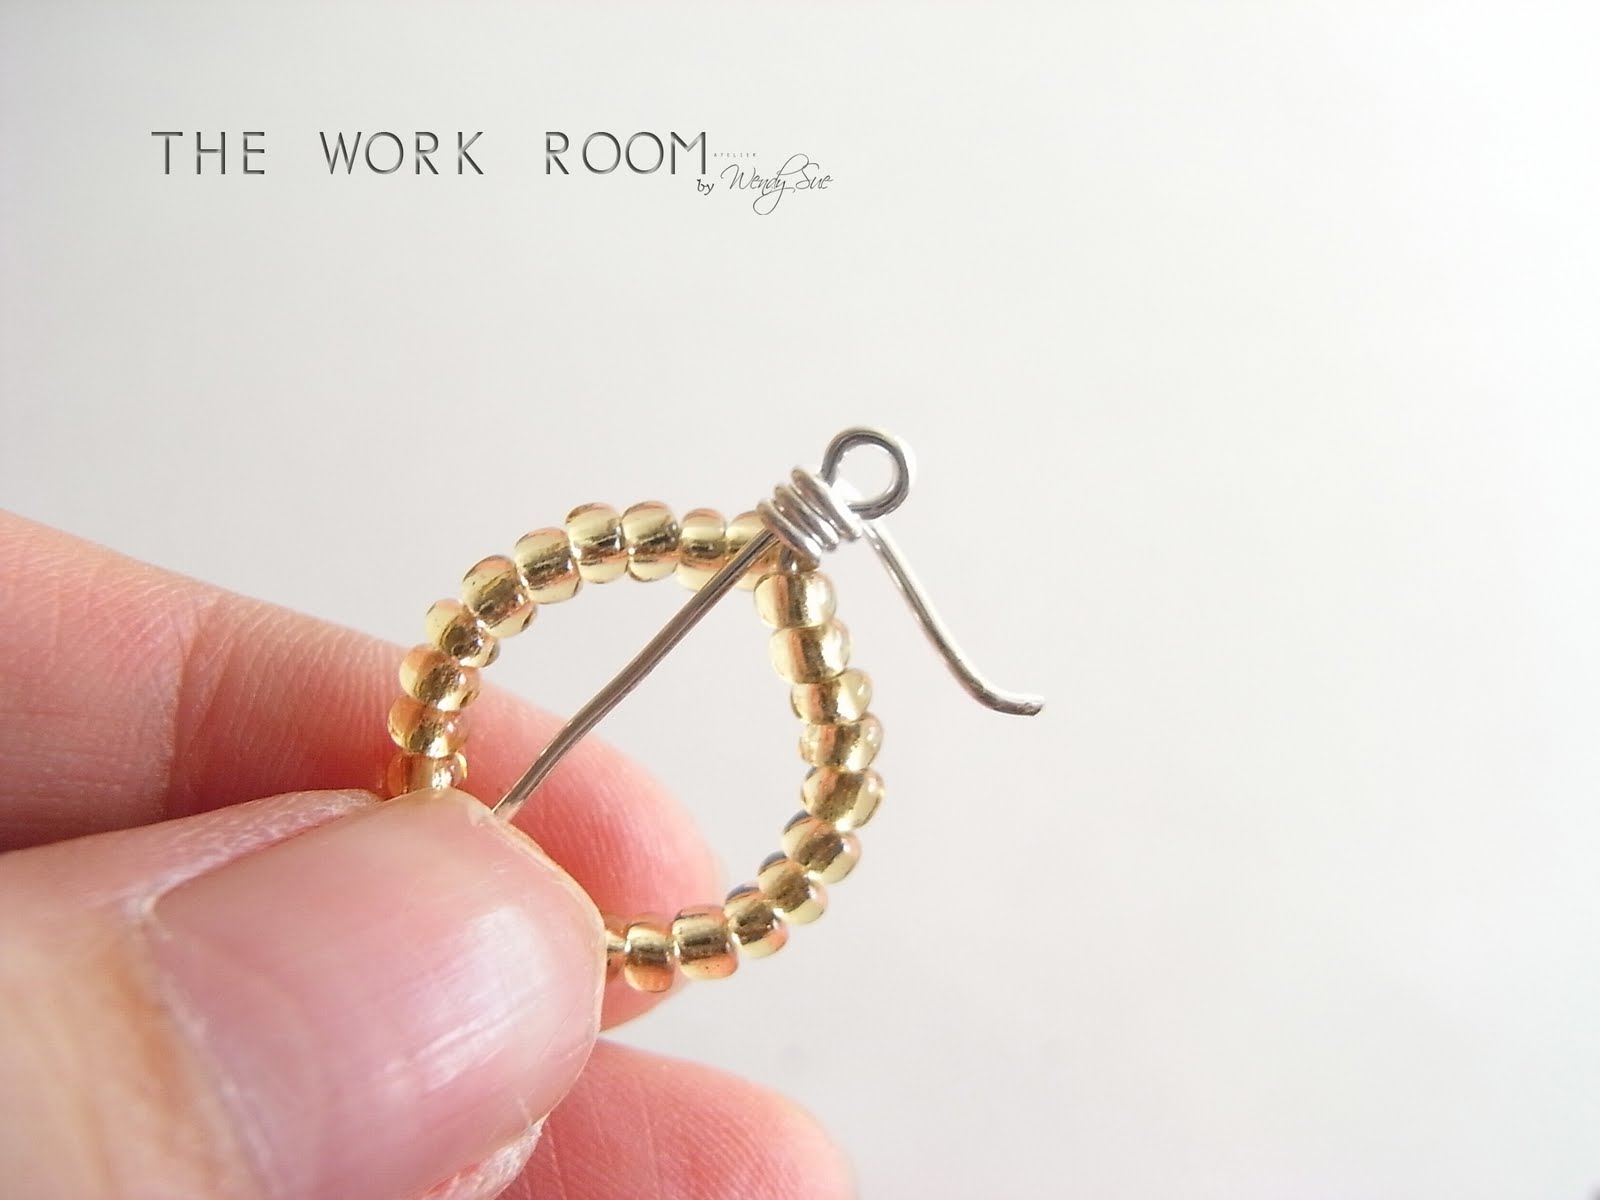
Once you've added the beads of your choice, make sure to push the beads right down and grip the top with your pliers to make a right angle bend.


Wrap the wire end around to make a loop.


At this stage, this is probably how it will look like.


And wrap your wire ends around a few times more to make a wrapped loop at the end.


Cut of the excess wire and do the necessary tucking in of any visible wire as we would not want to risk cutting the wearer!


Repeat the same on the other side and there you have it! I told you it was easy pezy! ;)


post signature

Read More...

Sunday, 21 November 2010

TWR058 Beaded Dolphin Charm Tutorial


Won't you agree with me that this beaded dolphin charm is just too cute? :D


In this tutorial, you'll learn how to make this beaded dolphin charm that you can then use as mobile charms or keychains. They make great gifts too! ;)


Tools & materials used:
  • (29) 4mm Swarovski crystal bicone colour A (body)
  • (8) 4mm Swarovski crystal bicone colour B (stomach)
  • (2) 4mm Swarovski pearl (eyes)
  • Monofilament/fishing line/Supplemax or equivalent
  • Scissors

Number of steps: 37
Page count: 16


IMPORTANT NOTICE:
  1. This tutorial is in PDF format and you will require Adobe Acrobat Reader to open them.
  2. File size: 764 KB
  3. The PDF file will be sent to your email address registered with PayPal within 24 hours or less.
PLEASE DO NOT DISTRIBUTE, LEND OR COPY. DO NOT MASS PRODUCE. PLEASE ALWAYS GIVE CREDIT TO THE DESIGNER. THANK YOU FOR RESPECTING DESIGNERS' COPYRIGHT.


nb: Prices may be subjected to change without prior notice.
Malaysian buyers, please contact me by email (atelierworkroom@gmail.com) for quotation in RM and payment by local bank transfer.


post signature

Read More...

Sunday, 14 November 2010

Make Your Own Fancy Toggle Clasp : Part I


Hello, folks! Haven't been updating for a while. So, how is everyone doing there? Lovely, I hope! ;) It has been quite a month for me so far!

Anyway, to kick start the jewelry making urge again, I share with you here how to make your own fancy toggle clasp. Well, the fancy part is where you can use beads to decorate it but if you ask me. I think it's more like a quick and easy one compared to the earlier one that we did before. 

If all the tedious wire wrapping work is not for you, then you just might like this one. :)

Here is what you'll need.

Apart from the usual stuff,


You'll need, additionally, beads of your choice. Here, I'm using size 7 seed beads but it's up to you, really.


Cut out approximately 5" long of wire.

Talking about wire, one thing to note is to use a thicker wire here since you'll only be going around the mandrel only once in which case you'll need a thicker wire for sturdiness but yet not so thick that your beads can't go through it. Any wire size no less than 20 ga or 0.8mm should be okay.


Leaving about 1 1/2" tail on one end of the wire.


And make this kind of loop. Yes, I'm calling it this kind of loop because I can't think of a name to call it. =P 

Anyway, I shall not be repeating myself again. For a detailed instruction on how this is done, please visit here.


Right, after you've made this loop. Grip your chain nose pliers onto the longer end of the wires, gripping it very close to the bottom, leaving just enough space for you to wrap 'neck' later on, and make a right angle bend.


Decide on the size of the ring that you want to make and place the ring mandrel on top of the longer wire end. You'll be wrapping the longer wire end around the mandrel.


Pushing the mandrel very close to the base..... (you might find that the shorter end of the wire 'forced' to move to the sides and no longer aligned in a straight line but that's okay because it can be rectified later on.


Wrap the longer wire end around the mandrel once.


Remove the wires from the mandrel and this is somewhat how the wires will look like. A bit distorted, I know but fret not cuz we are going to reshape it.


Using your fingers, of course! :)


Just move the wires around a bit so that they are aligned correctly.


Tadah! :D


Next, just slide the beads of your choice onto the longer wire end forming the ring.


Now, make sure you get the beads right down to the base but yet you should leave enough space for you to wrap around the 'neck' so that the beads are wrapped tightly within the circle.


This is what I mean by getting the beads as far down to the base as possible.


But also leaving enough gap in between for you to wrap around the neck.


Wrap the longer wire end around the 'neck' and the shorter wire end.


And cut off the excess wire and you're done!


That's quick, isn't it? ;)

Part II here.


post signature

Read More...

Saturday, 6 November 2010

A Quick Note

Alright, I know it's been a while. Work has been a little hectic and I'm currently outstation.

I received a disappointing email today. Apparently one of my buyers of my tutorials did not receive the tutorial that I have already sent her. I believe this to be a genuine mistake in the glitch of system as it sometimes do happen with technology. Hey, nothing can be perfect...... or at least that is what I believe to be so.

Either way, I'm not such an unapproachable or unreasonable person. If some kind of problems arises in any way at all, I would really appreciate it if you contact me first to check what's going on before filing a dispute with PayPal. I wouldn't possibly have know if something have gone wrong if you don't tell me and therefore won't be able to help you resolve it.

It complicates matter really to do otherwise.

Will update this blog when I get back.
  

post signature

Read More...

Related Posts Plugin for WordPress, Blogger...