Part I here.
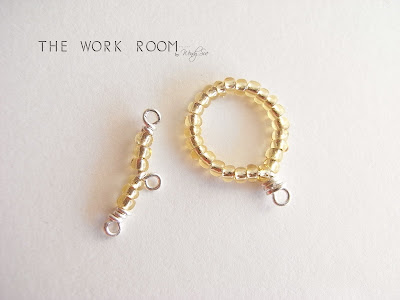
If making the fancy ring clasp for your own handmade jewelry was quick and easy, then making this T-bar for your own toggle clasp to finish off your bracelet or necklace is easy pea! ;)
Well, if you ask me, I believe this handmade fancy toggle clasp for your own bracelet or what not is perfect for beginners in jewelry making or just anyone who do not fancy the wire wrapping version since, admitedly, they are indeed more tedious work and more time-consuming.
So, if you want a quick and effective one, you can try this! ;)

Okay, to make the T-bar is really very easy. A pre-requisite is that you have to know how to make a wrapped loop. If you do not, you may want to visit here.
So, first thing first. Measure the diameter of your ring to decide on the length of your T-bar because logically, your T-bar needs to be longer that the diameter of your ring in order to 'lock' together.
As you can see from the picture here, my T-bar is approximately 1/2" in diameter. So, my T-bar should be longer that 1/2" but yet I don't want to make it too long else it might appear a bit chunky
I cut out approximately 5" long wire.

With my round nose pliers, I grip onto the center of the piece of wire.

And wrap the wire around the nose to form this kind of loop. Do you see a 'T' forming now?
Note that the two ends of the wire are level to each other.

Now, twist both wires around to secure their position. If you would like the 'neck' of the T-bar to be longer, you can of course twist the wires around more than once. (See how much fun it is to make your own jewelry findings? You can have control over pretty much everything!)

This is roughly how it should look like now.

Now, to complete the arms of the 'T', we need to do a little calculations.
Alright, we know that the diameter of the ring is 1" long. Technically, we'll need to measure the arms to be more than 1" but fact is we are going to retain the length of 1".
Why, you ask? How can the two lock when they are of the same size. The T-bar would have easily slip out from the ring.
But here's one thing you have probably forgotten. The loop at the center and ends (where I'll show you hotw to finish it off), all add some length to the T-bar. To ignore this fact might end you up with a much longer T-bar than anticipated. Therefore, it might be a good idea to retain the size and let the additional work naturally add length to it,
So, dividing the full length into 2, you'll need to measure 1/4"on each end.
I won't be adding on anymore measurements to it because by the time I end each end with a wrapped loop, it will inevitably add on to the measurements, which is why I'm adding beads on each end at 1/4" length.
I

Once you've added the beads of your choice, make sure to push the beads right down and grip the top with your pliers to make a right angle bend.

Wrap the wire end around to make a loop.

At this stage, this is probably how it will look like.

And wrap your wire ends around a few times more to make a wrapped loop at the end.

Cut of the excess wire and do the necessary tucking in of any visible wire as we would not want to risk cutting the wearer!

Repeat the same on the other side and there you have it! I told you it was easy pezy! ;)


0 hollers:
Post a Comment