About The Work Room

The Work Room is the Creative Journal of Wendy Sue where she shares her creative journey in all things handmade. The Work Room also offers an alternative to your typical jewelry making workshops. Scroll down to the end of the page to see how you can learn to make your unique piece of artisan jewelry online.
Showing posts with label Beadstitching / Beadweaving. Show all posts

Wednesday, 6 March 2013

Introduction to Right Angle Weave (R.A.W.)


So, I get this question every now and then on whether my tutorials uses 'cross weave'. So, I thought it apt that I write a post on this subject. (Actually, I wrote about  this before, just not here. I can't believe I've not touched on this topic before here!)

Yes, I use mainly the 'cross weave' technique or what some might call it as two-needle
Right Angle Weave (R.A.W). However, in my very early stages of doing R.A.W, I used to Use
the one-needle R.A.W but once I learnt about the two-needle one, I've not look back ever since.

The pendant above was actually one of the few earliest project I did on R.A.W. which I thought was rather easy to follow and understand. I reckon most of you would have been familiar with this stitch already but for those of you who have not tried making jewelry before, you might want to give this a shot. I've always think this to be a very simple yet effective project.

Before i jump straight into the project and also for the benefit of those not in the know, let me share with you my interpretation of what is a 'cross weave'.

Now, I use this phrase a lot --> "Cross both thread ends at ......"


This is the literal way of explaining the position of the thread for this stitch. Now, what happens is both the ends (hence, the two-needle idea) of a thread crosses in the opposite directions through the beads.


I will zoom out a little to show you the bigger picture. It is normally done in sets of four beads but it can also be more than that, but that's another story.


So, what happens as you pull the two thread ends in the opposite direction is the bring all the beads close together and more often than not, in a full circle.

Alright, now that you kinda get an idea what it's about, let's give this stitch a try.


Okay, first things first. You will need:

  • (8) approx. 5X8 mm rice shaped freshwater pearl
  • (4) 5mm Swarovski bicone bead
  • Fishing line
  • Scissors


Step 1
Cut out approximately 50cm long fishing line and string on 1 pearl, 1 bicone, 1 pearl and 1 bicone


Step 2
Cross both thread ends at the last bicone bead you added. You will see that the beads now form a circle, or rather rectangular-ish since the 4 beads form 4 sides.


Step 3
String on 1 rice bead and 1 crystal bicone on the left thread. String on 1 rice bead on the right thread.


Step 4
Cross both thread ends at the crystal bicone.


Step 5
Repeat step 3 and 4 one more time.


Step 6
String on 1 rice bead on the right thread and bring the thread end down and pass through the crystal bicone right at the bottom.


Step 7
Repeat step 6 on the left thread.


Step 8 
Pull tight and you will see the barrel forming.


Step 9
Bring the right thread up and through the rice bead, to the left through the crystal bicone and down through the rice bead so that the two thread ends meet.


Step 10
Tie a knot and you're done! Well, not quite. :) There's still some finishing off to do!

We need to end the threads and it's not like we can cut off the excess thread just like that. Even with a knot, the material of the fishing line itself is such that the knot will tend to 'slide' open if left in the 'open'.

So, this is what we need to do.


Step 11
Pass both thread ends through the surrounding beads before cutting off the excess. There's really no rule on how you should pass the thread around but as a rule of thumb, if there is one, pass it through along the thread path and the more beads you pass through, the more secure it is. And passing the thread in a 'zig zag' fashion will be more secured than say, in a 'straight' fashion.

Did I hear a "Huh?"

LOL .... okay, that's another story I'll leave it for next time.


Alright, back to finishing off the threads. Like what you see in the pictures above. I started with passing both threads down through the pearl bead. And you can continue by passing through the bicone bead on the right and thereafter the pearl bead below it on the sides and on and on,  up to you.

But since this Is only a small project/object, I think I'll just stop here and cut off the excess.

For the technicality of finishing off thread, you can refer to this post here.


Now, using the same stitch, try experimenting with different sizes and shapes of bead and see how it turns out to be.

Have fun! ;)


post signature

Read More...

Wednesday, 26 October 2011

Adding New Thread


I was asked  on how I add on new thread to a particular project. So I thought I would do a post on this topic. I think this concept works the same across the board, regardless of what project it is.


So, when do you add new thread?

It's quite subjective. Some people feel comfortable working with shorter lengths of thread but some people would rather work with longer threads to avoid the hassle of adding new thread. But if you ask me, adding new thread is unavoidable is you do bead weaving. At some point, you would need to add new thread.


There are many ways that you can add on new thread but generally, there are two things I consider when it comes to adding new thread :-

1. The type of stitch I was doing; and
2. The type of stringing material I was using.

In my case :-

1. Since I do the two-needle R.A.W (some are more familiar with it as the cross weave) most of the time; and
2. Use fishing line all the time

this is how I always add on new thread.

I also used to do some other stitches like peyote (or some refer it to gourd) stitch where I used a different way to add new thread, but that's another story.


How I do it is very simple, really.

What I do is finish off the old thread by weaving it back into my work like how I would normally end a project before adding on the new thread at the point where I stop to finish off the old thread earlier on.

First thing first, at what point do you stop to add new thread?

Two things I do :-
1. Make sure you leave enough tail; and
2. Stop at the point where both thread end crosses.

Make sure you leave enough tail for you to weave back in. It's up to you really at which point you think want to stop your work to addI leave a minimum of 3" long thread. You don't want the thread to be too short because not only longer thread will make your work easier but also more secure. On how it makes it more secure, I'll explain it in a while.


Well, if you are doing a cross weave, every step ends with both thread ends crossing. So, at what point do I actually stop? Well, this has a rather relative answer.

It depends on the project on hand but what I normally do is to stop at the point where I consider it to be a 'secure point'. Which is the point that I consider to be the 'secure point'? But a good guide can be when you are done with one 'cycle of repetition'.

Take the project in the picture for example. It actually has a base row that I then embellished with additional beads on top of it. So, if you ask me where I think would be the 'secure point', I would have to say that it's the base row after it has been embellished with additional beads.


Here's a look at the base. You'll see that I have pass the thread around so that the two thread ends meet (individual thread path shown by the blue arrow).


Just like how you would finish off any piece, you are going to tie a knot between the two thread ends and the weave both thread ends back into your work again.


Now, the further you weave back into your work, the more secure it is, which explains why a longer tail end is needed earlier.


Two things to take note of at this stage.

1. Where you end with the know. Remember earlier when I explained how that the knot is hidden in the bead hole when you finish off your work? So, wherever it is that you decided to knot, make sure that no more thread will be passing through that bead where the knot is hiding or you will have difficulty passing the thread through because the knot is already blocking the thread path!

2. As you are weaving your thread back into your work, make sure that it is done in a 'zig zag' manner i.e. don't weave them back in a straight path but rather pass the thread through the beads up and down. It's the turning 'angle/corner' that will secure the position of the thread path. Get what I mean?


Turning back to the front, it looks like the ends are finished off already but we are going to continue.


Cut out a piece of new thread and pass it through the bead where you decided to stop earlier on, In this case, it's the bead on the edge at the base. And continue weaving.

Well, that's how I do it, regardless of what project it is. It's still the same principle. :)

Hope this helps!


post signature

Read More...

Sunday, 27 February 2011

Ending Right Angle Weave (R.A.W.)


There are probably a few ways you can end a Right Angle Weave (R.A.W.) especially depending on the type of stringing material you use. Since I almost exclusively use fishing line and two-needle R.A.W for all my beadweaving so this article is actually about ending R.A.W with fishing line.... or monofilament....or.... Supplemax .... well, or those similar to these.
Phew! That's quite a mouthful.

Now, my ending sentence in any beadweaving project is always this :-

" Pass the thread around so that the thread ends meet. Tie a knot. (well, you will need the two thread ends to meet first before you can tie a knot, can't you? :P) Pass both thread ends through your work again to reinforce the knot before cutting the excess thread off "


So here's the thing abour fishing line. Thing is even after you have tied the knot, the knot can easily come loose even without you realising it.

Sure enough you see me loosening the knot here with the help of a needle but what I'm trying to say is that it can heppen. I think it's largely to do with the material of the fishing line itself which has a smooth and glossy surface which it can easily slips and untie itself.


Therefore, if you were to cut ff the excess thread right after the knot, you might find the knot loosen and untie itself and your whole piece of work will just 'crumble' and fall apart.

Now, THAT's something I bet you don't even want to even imagine about!

So, this is actually what you do or the 'mechanics' behind it, so to speak.

Now, after tying the knot........


You are going to pass both the thread ends through any bead next to the knot. Any bead will do but it should be the one immediately next to the knot.


Now, this is what happens as you pull the thread through. You'll noce that the knot will also be pulled towards the hole of the bead as you pull the thread through ......


..... until the knot is hidden inside the bead hole. You will continue passing both thread ends through a few more beads before cutting the excess off.


This gives a nice finishing to your work where the knot is hidden from view and not to mention also since the knot is nicely tucked inside the bead hole, is less likely to untie itself and is therefore secure.

Bear in mind though that after the knot, both thread ends should pass through the same bead in the same direction to successfully tucked the knot in the bead. It can't be say, one thread ends pass through the right and the other pass through the left. Both should pass through either the bead on the right or left.

So, yeah, that's basically how I normally do it. But of course if it's a one-needle R.A.W, this cannot be done since you have only one tail end and you can't really tie a knot with one thread.

Well, of course you technically can tie a know even with only one thread but then I don't think that's how they do it. Well, more on that next time. ;)


post signature

Read More...

Tuesday, 27 July 2010

Everybody, meet Derek.


Everybody, this is Derek. :)


Looking cool there, huh? ;)


I got to know about Derek when a friend in Facebook liked his Facebook Page link. And when I browse through the page, my eyebrows just raised! Well, not in a bad way but more like surprised!


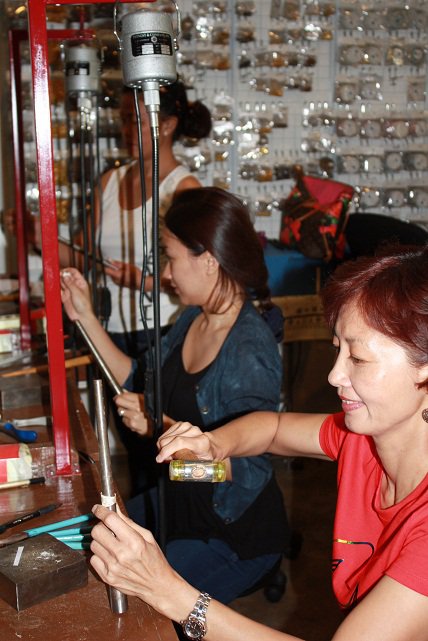
Very cosy looking studio.

You see, Derek's studio offers not only beading workshops but also lampworking and silversmithing! And to think that I actually travelled thousands of miles across the sea just to learn the latter two only to learn AFTER my return that both workshops are available just behind my backyard! Well, not literally my backyard, but you catch my drift.

I didn't realized such a place existed in Malaysia. I swear I've made a very thorough Google search before deciding that England was probably the next best place if I want to learn those two since I'll be going there for a break already. I've even checked up on Singapore ok and there was none, 'ilek', nil.


His studio also has strands of beads available for sale.

Well, true enough. He only had this studio a little over a year. That's around the same time I left Malaysia.

But when I learned that he has been doing this for 10 friggin' years already, I was like "C'mon, you kidding me, right?" Turns out, he wasn't.  o_O I mean, don't you think he looked waaay too young to have been doing this for a decade already? LOL.....=P

Another thing that struck me was how well-equipped his studio is. To the point that it was rather impressive if you ask me!


It's rather common to see bead board in beading classes but it's not often that I see them with worklights. If you have done beading before, you'll realize what a huge difference proper lighting can do with your work and at the same time not to strain the eyes. And if you've done enough beadwork, you should be able to tell the difference between working under sunlight and normal light. Apart from the fact that the classes are conducted indoors and hence the dimmer lighting as I presumed from the picture but if those two table lamp I see there are daylight lamp, I'm even more impressed cuz I know thes thing don't come cheap!

I'll tell you why daylight lamp are the best. Well, basically the light simulate that of natural sunlight and thus reduces eye strain and glare ensuring that you work in optimal comfort.

How thoughtful!


Looking at this picture sure feels like deja vu!


Even his silversmithing workbench appears to be very well equiped with all the necessary tools. Do visit his silversmithing photo album in his Facebook page to see more. And if you browse through the description of the course from his website, I dare say that it does sound like one hella-vu comprehensive course!


Even his lampworking work station is just as impressive! From the picture I see, I'm guessing it's a 4 seater work station equiped with the micro torch and all the necessary tools.


Another interesting workshop conducted by the studio is the beaded lamp course.


The luxury lamps. LOL.... XD I think bead lovers would have loved to have this in their living room or bedside table. Functional ornament, I call them. :)


Totally awesome with lights on, isn't it?

Check out this video below to see Derek 'live'.


You guys know what really caught my eye in the video?

This!


Why didn't Diana or Sally tell me that there was such a thing?!


Then I think I would have a better chance of scoring with a round bead despite being only a beginner lor!


*Runs like an ostrich and buries my head in the sand AGAIN*


p/s : I haven't had the opportunity to visit Derek's studio. All Derek T Creative Studio and Gallery are taken off directly his Facebook page, with his permission of course.

p.p/s : You know, if you ask me, I think it's better to take up these courses that are broken down into a few segments running over a span of time rather than 2 full days crash course like what I did. There's simply just too much information to be able to actually digest and take them all in 2 full days. The misfortune I experienced with my Beginner Silversmithing course was an example.

p.p.p/s : Derek's studio is in Plaza Damas, at Sri Hartamas. Lucky you people who live near there!


post signature

Read More...

Related Posts Plugin for WordPress, Blogger...